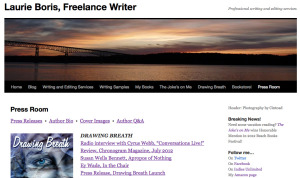
 Imagine this. In a tireless effort to promote your latest novel, you’ve carpet-bombed the local media with press releases — as yet to no avail. Now you’re at your day job, inserting tab A into slot B or herding Nerfs or whatever you do to make the mortgage payments. Hey, no judgments here. Your cell phone chirps. Sweet merciful Oprah, it’s the book editor of the biggest newspaper in your area…well, her assistant, anyway. The Big Name Author she’d planned to feature was just tagged for plagiarism and other unspeakable affronts to literary sensibilities. You’re the next name on her list, but if you want those precious column inches, she needs your full media kit immediately. What? All you have is a cell phone with one bar and a dying battery, and a whole bunch of random stuff scattered all over your hard drive at home.
Sorry, Charlie. You’re SOL.
But what if you could direct her to the handy press room on your website, where in mere seconds she can cut-and-paste everything she needs to create a spiffy profile? Yowza, you’re in business!
The good news is that tacking a press room onto your website is wicked simple. You don’t even need a fancy-pants designer site. Most of the “big” freebie blog sites like Blogger and WordPress will let you set up a reasonably professional-looking website with multiple, nested pages. If you spring for a domain name (yes, Jim Devitt, it’s tax deductible!), you get the luxury of dropping the “blogpress.com” or whatever after your name.
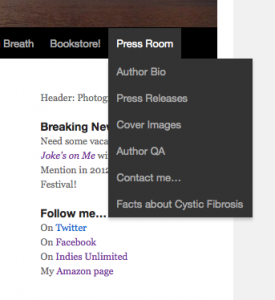
(Disclaimer: I’ve based these instructions on the way I put together my own press room on my WordPress blog. You may want to organize yours a little differently, depending on the design of your website, what you write, and how you promote. For instance, here’s how K.S. Brooks did hers.)
So, assuming you already have a website, let’s add a press room.
1. Gather up the goodies an editor-on-deadline might need:
• A good headshot.
• A short author bio.
• JPGs of your cover(s), in a variety of sizes.
• Press releases.
• URLs, videos, or recordings of any interviews you’ve done.
• A sample author Q&A.
• A list of talking points (if relevant) about your book or its content. (For instance, even though Drawing Breath is a novel, I anticipate being asked questions about cystic fibrosis. So I post the URL to the Cystic Fibrosis Foundation’s “About CF” page.)
2. Create a new page on your blog/website named “Press Room.” I know, you beautiful creative people, you want to call it the Daily Planet or whatever, but stressed-out editors hate playing games. Call it the Press Room or Press Kit or Media Resources, something where people who are doing YOU a favor don’t have to tax valuable neurons parsing what’s there. Get it? Make it easy.

3. On that main Press Room page, create an index of items you’re making available.
4. Create several “nested” sub-pages underneath the Press Room page, one for each category of goodies. Name them accordingly. How to create a sub-page in WordPress: On the upper left-hand side, under the name of your blog, go to New/Page. On the right-hand side, under “Page Attributes,” choose the “parent” of this new page. In this case, the parent page would be “Press Room.” Order these sub-pages the way you like by filling in a number in the “order” box. Then put whatever you want on this page. Repeat as necessary.

5. Add the appropriate content to each sub-page. (Note: on your cover images page, DON’T link the image to another URL, say, your Amazon “buy” link. This makes it harder to download the JPG.)
6. Link the URLs of your sub-pages to your main Press Room page index the same way you’d add any link. Select “open in new window” to keep viewers on your website.
Finally, make sure all your links are working. Getting “page not found” error messages when you’re on deadline really sucks.

Terrific advice, Laurie, thanks! I’m going to do that on my website, just as soon as I finish Nerf-herding! 🙂
Thanks, Chris. Better get ’em all back in the pen, first. Remember what happened last time. 😉
Ack! More to learn – and do. Great stuff Laurie. Thanks.
You’re welcome, Yvonne…and thanks! 🙂
I’ve bookmarked this article and will play around with the instructions in the morning. Great post Laurie!
Thank you! 😀
And good night…or morning…oh, I’m still confused.. 😉
Don’t name your page “Daily Planet” though. Trademarked term. And you don’t want Clark Kent to come looking for you. He can see through clothes. And engine blocks.
Seriously. The dude will mess you up.
Lovely! That is my next project! Thanks for the great advice!
Thank you, hope it helps!
Excellent post, Laurie! You made me realize I just have a lame “about” page on my blogs – I should link them to my press room. Well done. 🙂
Thanks! Reinforce the EMPIRE!! 😉
Fantastic advice. Thanks. Will be sharing.
Thanks, Tasha!
Here is a link to my press kit page:
http://www.jjohnsonhiggins.com/#!press-kit/c1mj2
I’ve been studying a lot of the good, the bad and the ugly versions of these and this is how mine turned out. Everyone feel free to exploit this arrangement if it helps you do yours!
Genius. 🙂 I’m on Blogger, so I’ll have to figure out how to do the nested pages.
Lynne, I think it’s pretty similar. I may have also done this on a Blogger site at one point. I’ll check.
That would be awesome, thanks! 🙂
Arg, more work. 😉 Thanks Laurie.
Wow! Excellent advice, Laurie! I’m not an author (yet!) but I have been trying to set something up that incorporates these items. Until I read this, I was stymied! Thanks for this.
Great idea, thanks.
Unfortunately I think the way my site is set up I can’t do this. When I ‘create page’ it looks just like the page for a blog post. Grrrr. I need a new website. This one is partly custom, partly WordPress. But clearly I don’t have the same flexibility as a run-of-the mill wordpress site.
Great post, Laurie. I’m glad I bookmarked this. Thanks!
Thank you, Lois. I hope it was helpful! 😀
Fantastic post! It’s bookmarked and on my list of projects now!