 One salient fact about doing graphic design–in this case making your logos and covers and other pictures writers need to go with their thousand words–is that you need to have a graphic program to do it with. This is actually not a problem, but it’s not hard to run into advice and situations that make it seem like a problem. As with so many other things that writers have to learn aside from writing these days, a main issue is knowing what to avoid.
As promised, I’m going to tell you about the programs to do this stuff with, and a bit on how to maximize your use of them. The programs I suggest are all free, or at most very cheap. Let me say a word about programs that aren’t free and cheap. The first thing you always hear when asking about doing your own artwork (or googling for suggestion on how to do something) is Adobe Photoshop. This is a professional program that costs anywhere from $300 to $1000. Most would say that getting what you need runs around $700. That should be enough to convince you to skip it and look elsewhere. But it’s worse than that. It’s a hard program to use, and is set up kind of awkwardly and bassackward. I used to use it and considered it a pain in the butt. For awhile I only used it to bevel type and the “smudge” tool. Now I don’t even have it installed. Almost anything you need to do can be done easier with free programs, and often better. And PS has some glaring problems for people like us. For one thing, its vector structure makes it really bad at shrinking picture size. As one example of what I mean, on Paint.net I can just keep hitting Ctrl Z (just like in all Windows programs, notice?) and delete changes one by one, all the way back. In Photoshop you get one “redo” then have to go into the history and fool around with that. Not a huge human sacrifice, sure, but something you have to learn. There are big thick books on how to use Photoshop. It’s got learning curve like Rosie O’Donnell has hip curve.
So what should you use that’s free and easy? There are some very, very good programs: the ones I most recommend are very easy to use right out of the box, and can be customized to do pretty much anything Photoshop can do. Both have smudge tools now. You can create and use layers without a PhD. Here they are, starting with your basic or “core” programs that will be the basic tools for your graphic creations.
FREE “CORE” PROGRAMS
WINDOWS PAINT
 Many would scoff at my even including this, but for some it might be all you need. And it comes installed with Windows, always has. It can’t do much, but what it can do is load a picture, resize it, flop it horizontally or vertically, crop it, save it as the format you need (jpg, gif, etc.), and let you add type titles on it using any font you have on your computer. That may be all you need and kindergarten kids–literally–use this program. It’s right there on your Windows computer, pull it up and mess around. If you have zero experience, it’s a great basic sandbox to explore the things that graphics programs do. Crop, use the “paintcan” to flood in a color you pick out from the design with the “eyedropper”, create outlines or color blocks, color out of the lines and go wild like a three year old. Try uploading a picture, sizing it, adding a title, and saving it. You can do it, easy.
PAINT.NET
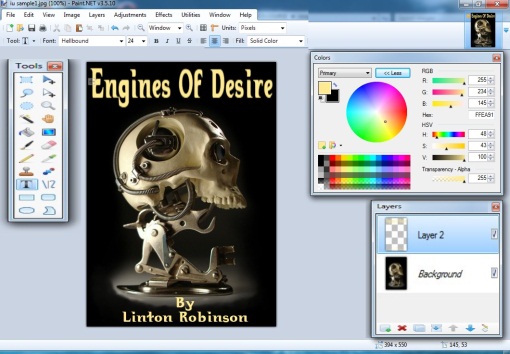 Paint.net was basically a build on Paint, but it’s grown into a powerful, simple, glorious way to do graphics. Frankly, if you have Windows and don’t have this program, you’re nuts. Even if all you do is make Christmas cards and goofy distorted pics for your kids. If you have ever used Paint, you will find you already know how to use Paint.net, just need to learn the new features. And they are really easy to learn. Using layers is a pain on Photoshop, on Paint.net you hit the tab, click to add layers, and go. You touch the “magic wand” to the new layer and hit delete and Pow, you have a transparent layer. Type in your title and manipulate it move it, scrunch it, feather it… then collapse the layers and you have totally controlled title type on your image. The screenshot here shows a photo with titles being composed on the checkered transparent layer in order to be manipulated, then “pasted down” over the artwork. The new layer appears at the touch of a button and you can choose which layers to see, and which to work on. You can also see the tool bar here, and the full color window which gives you total control of colors, including their transparency in case you want to see through them to the background design.
But “simple” doesn’t mean “retarded”: you can add plug-ins to do amazing things with Paint.net. Blur edges, create psychedelic versions, roll it into a tube, bevel edges of anything you select, convert a title into a circle, apply dozens of blurs and glows and distortions, alter the colors and brightness, generate special modes like sepia tone…all very easy to do, usually with one click. There is a plug-in that will convert an image (stone or wood or hay, let’s say) into a “tile” that will be seamless if laid up side by side–perfect for website backgrounds, or maybe even a book cover.
If you use Windows, this is your huckleberry and no two ways about it. Free download at GetPaint.net. http://www.getpaint.net/download.html (Any downloads I post here are absolutely safe and proven.) Any help or advice you need is generally available on their forums http://forums.getpaint.net/ or just by googling. “Paint.net 3-d titles”, for instance, or “Paint.net transparent layers”. I’d suggest that once you download and install it you immediately figure out how to add plug-ins (NOT difficult; just download into the folder they tell you to) and add some that you will need or enjoy. This sub-forum http://forums.getpaint.net/index.php?/forum/7-plugins-publishing-only/ lists plug-ins and has a tutorial on adding them. Not hard to do—basically opening zip files into the “Effects” directory of your Paint.net folder in Program Files. Most installers do it automatically. You can usually find what you need by googling for it. There are lots of “Packs” of plug-ins (also called effects) like the MadJikPack or Ed Harvey’s. One problem with getting packs that brag about how many hundreds of effects they have is that they clog up your menus and you have to figure out what they are and how to use them.
Some I use a lot are Soften Portrait (popular with the ladies), Sharpen+, (almost any blur), distorts (Tube Oblique, Bulge, Oblique, Perspective), Glow, Smudge, Sepia, Color Balance, Drop Shadow, (anything “selection”). I have hundreds I never use and don’t understand.
G.I.M.P.
 But what, you might be saying, if I’m too hip to use Windows? Don’t worry, there is another world class great free program that will run on any platform, GIMP. Stands for–like it matters–GNU Image Manipulation Program. GNU stands for “GNU Not Unix”. I think you see this could go on forever. Main thing, it’s not named after the kink sex slave in “Pulp Fiction”. It’s a fabulous program and you might want to install it even if you do have Windows because it can do some unique and handy things. Also, you might prefer it. This is another program with a large fan community, and people continually design improvements on it.
The knock on GIMP is generally that it’s “alien”. It does things differently. Instead of a single window that opens up images and boxes of tools, it’s a bunch of windows strewn around your screen. Not a huge barrier to understanding it. The way it selects and sets type is odd, but you catch on–and it’s actually handier when you learn to just hit the “larger arrow” and watch your text just expand in front of your eyes. It takes awhile to realize that when you add type or open a filter (like one that will turn that type into molded gold or hardwood or whatever) the options open new windows, which might not be immediately visible unless you click on them at the bottom of your screen. Again… not a brain strain. I don’t think GIMP works quite like any other program. But if you are new to graphics and own a Mac, what does that matter? You turn it on and start learning. You’ll learn nicely, trust me.
The two things I tend to use GIMP for are its smudge/smear tool, which is more powerful and easier to use than the Paint.net one–maybe better than the Photoshop one, and the Alpha To Logo filter. Smudge may not sound like much–and it takes a little bit of learned skill, like using a brass nibbed pen–but is invaluable. It’s like running a wet finger over a watercolor. Got a bunch of jaggedy pixels around the Viking you pasted into your landscape? Set the smudge tool to a small circle and carefully soften them up. How cool is that? Now take a look at your author photo. A little wrinkled? Smudge those furrows and zits and scars away.
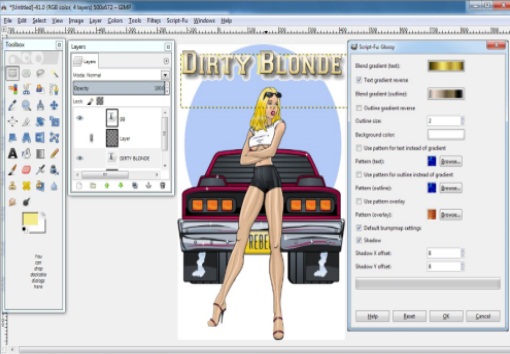
Alpha To Logo is super magic for making titles and logos and banners. You type in “My Cool Book” with the Text tool, then open A2L and look for a nice way to alter it. How about bronze? How about fuzz or flames or calfskin or alien neon glow? It’s very useful and it’s just one little stunt this program can pull. The screenshot here shows cover art, a titles layer, and the menu for the “Glossy” filter of A2L, which has turned he title gold with an outline and drop shadow.
Download and install from GIMP.org. http://www.gimp.org/downloads/ Like much about GIMP, it’s a little itzier, requires downloading an installer first. But not rocket surgery.
There are simpler free programs for Mac users. I can’t evaluate them, but these get good marks from users.
Paintbrush http://sourceforge.net/projects/paintbrush/ A Basic easy-to-use Paint application
Seashore http://seashore.sourceforge.net/The_Seashore_Project/About.html Open source image editor based on GIMP, but far less complex.
And for those who like the idea of Paint.net, there is a clone of it for Mac called Pinta http://www.downloadcrew.com/article/22997-pinta
OTHER GOODIES
There are literally hundreds of free graphics programs. If you don’t like these main ones, you might find one that suits you better.
Artweaver http://www.artweaver.de/index.php?artweaver_en Very popular easy program
Inkscape http://inkscape.org/ A sophisticated drawing program
DAZ http://www.daz3d.com/ This is a free program for generating Computer Generated Images. You can make the mannequin people you see. Do NOT use CGI people on your covers or I will come to your house to kick your kids and molest your pets.
Some I use a lot are Soften Portrait (popular with the ladies), Sharpen+, (almost any blur), distorts (Tube Oblique, Bulge, Oblique, Perspective), Glow, Smudge, Sepia, Color Balance, Drop Shadow, (anything “selection”). I have hundreds I never use and don’t understand. I have placed about 74 useful plug-ins in a zip file. You can download it here: http://linrobinson.com/download/PaintNet.zip
Unzip it and place the files in the Effects folder in your Paint.net program directory and when you start it up you should see them.
I’m running long, but there are a few more specialized programs I’ll discuss down the line. Next time I’ll get into how to make logos and buttons and banners.
For now, I’ll leave you with a link I’ll do more with next time. If you are in immediate need of a button or avatar or logo/banner, you can do them easily, for free, online at CoolText.com. http://cooltext.com/ You’ll be amazed at what you can accomplish without having to know a damned thing. And, they have a fantastic library of free specialty fonts that are very easy to search, download, and install.
Also next time—how to make animated graphics.

Let me add a link here. Paint.net is the program I use most, as default, and I urge it upon you. Much of what I’ll get into in subsequent posts here will be based on using Paint.net.
I mentioned some handy plug-ins. To make things easier for people starting up with that program, I have placed about 75 useful plug-ins in a zip file. You can download it here: http://linrobinson.com/download/PaintNet.zip. Unzip it and place the files in the Effects folder in your Paint.net program directory and when you start it up you should see them.
Instructions on the simple task of adding effects can be read at the link in the main article.
Thanks for pulling all of these plug-ins together, Lin.
Hopefully saves a little time for those getting started. Plug-in collecting can get as absobing as any other collection. 🙂
I love Paint.net. I use it for all my graphicing needs, but find that it doesn’t do text very well. Maybe I don’t have the right plug-ins. I use PhotoScape in addition to Paint.net for the text.
Should require any special effects. GIMP is actually more powerful for text. I use it sometimes to set wider spaces between characters, but that’s unusual.
Nice! Excellent compilation–thanks!
Have to disagree with your dislike of Photoshop. It is a wonderful program to me. Couldn’t live without it. Also I know it has a pen tool and is getting better and better support of vectors, but it is surely a pixel based programme – not a vector based. Are you getting confused with illustrator? Or am I missing something here? (Wouldn’t be the first time.) Perhaps my version of photoshop is so out of date things have completely swapped around or something
Nope. I’m talking about photoshop. VERY expensive. I live without it happily.
Actually, my experience is with an earlier version. If you google on this you run into a LOT of users complaining about loss of image quality on shrinking.
Photoshop is pixel based–that’s why it doesn’t shrink well. Only the pen tool is vector. Illustrator IS vector-based, so it will shrink well. The main problem with shrinking in Photoshop is that the line thickness shrinks along with the image. You need to create based on the final desired size. Years ago I got photoshop free with purchase of a scanner. I had to use it at work, so I got the week long training class. I’ve heard that you can get version 2 of CreativeSuite (photoshop) for free. I prefer my old version 7.5
http://www.itworld.com/consumerization-it/334097/free-download-adobe-creative-suite-cs2-photoshop-or-other-adobe-software-n
You’re right. As is Tui. I mis-spoke. It’s been years since I messed with PhotoShop and I got the vector thing turned around.
But the objection to it’s “shrinkability” is a very real one. And if you’re working from existing photos or artwork, you can’t create to size.
That link is to a FREE version of Photoshop, by the way folks. Removing a big objection to it… the price.
I still think you’re better off with Paint.net, especially if you’re not experienced with graphics, but it’s good to have that option.
Another scheme on this, which I didn’t include for the sake of brevity (not my long suit) is to use your word processor to generate graphics. It’s crude, but low learning curve. Shelagh Watkins does this for her covers http://shelaghwatkins.co.uk/
Basically, you do background color or pattern, insert pictures and move them around, set the type using the usual writing method, then save the file as HTML and screenshot capture it, or print it as PDF already sized for upload.
Oh gods, Word’s graphics handling ability is *miserable*! If you’re gonna go that route, at least create your picture in PowerPoint….
Thanks for the link to my site, lin. Unfortunately, all the covers were produced using Photoshop Elements 6.0, although I did use Word to produce simple covers for ebooks. Sophisticated covers using layers are fine for print books but the best ebook covers have simple designs with strong colours and large font size for title and author. Print book covers look great full size but the thumbnail size used in the “also boughts” list on Amazon reduce books to a blob of colour — subtle covers therefore have low impact.
I guess I was referring to the covers you mentioned the Word process for in your blog, Shelagh. I thought it was a pretty good trick.
Yeah, it’s the cheap and dirty way. PowerPoint is a good idea.
Lin, this is great stuff. I skipped right over Paint.Net and went straight to GIMP, like a dork. 😛 It works fine, but the learning curve is comparable to Photoshop. And sometimes a tool window disappears and can’t figure out how to get it back.
Thanks for the tip about Alpha to Logo, although I wish I’d known about it over the weekend, when I was wrestling a couple of book titles into submission. I’m still not thrilled with one of them, so I’ll have to look at A2L when I get home.
Try http://cooltext for that. Might be easier to get something you want.
http://cooltext.com/ that is
I have been creating my own covers for some time, and I must say that improvement comes with doing it. Each time I make a new edition of a book, I make a new cover; and when I compare what I can do now to what I did then, it’s always amazing.
And yep – I use free programs just like you Lin.
I find I need Windows Paint, a good PDF such as Foxxit, GIMP on the odd occasion (mostly for vectors) and good old Word.
Most of my new covers are on my Facebook banner, right behind my head. https://www.facebook.com/rosannedingli
Grab a load of that and be assured you too can reach that standard simply by DOING it.
Just what I was looking for, haven’t been able to find the money for Photoshop, so this is terrific. Thank you.
Hope it helps, Michele. This is “indie programs for indie writers” 🙂
Stay tuned for more graphic romance.
Most encouraging. Thanks, Lin.
I tried Gimp last fall and gave up on it. The reason we use Macs is because everything just works, and you don’t have to be a programmer to make it so. To use Gimp or Pinta, you first have to download some other program and make it work, then run it in the background while the real program is going. This makes it very difficult to set up at the start, and very slow while using it. I’ve tried on two different ages of Mac OS, Lion and Leopard, and had little success with either.
So I’m stuck with my “borrowed” version of Photoshop, which works wonderfully, I’m afraid. The day I make enough on my books to pay $400 for Photoshop, I’ll pay off my editors and graphic designer for all the work they have donated!
ok, PowerPoint now? Not free, and Office is yet another “expensive” program, and if you go that route, you still may as well use Photoshop! HOWEVER, that being said, OpenOffice has freeware compatible programs similar to Word and PowerPoint. Paint.net , just like GIMP, is a Photoshop-alternative. The good thing about GIMP is that you can do MUCH (not ALL, but MUCH) of what you can do in Photoshop, AND you can use both GIMP and Photoshop brushes in GIMP.There are TONS of free resources available online for Photoshop that can be used in GIMP. As for DAZ Studio, while you get a few decent free models, there IS a learning curve to creating your own, and you need to purchase other items and models if you want to circumvent that learning curve. Been using it for a few years now., and the newest version, albeit a FREE PRO studio, is a rather steep curve compared to earlier versions. When I downloaded it, DAZ was also giving away 2 other FREE PROFESSIONAL programs, Bryce ( a fantastic landscape and environment constructing program) and Hexagon, which is a 3D construction program along the lines of Blender, Maya, etc…..it now costs $20, but if you like 3D construction it’s still a great price! Once again, though, these programs have a steep learning curve. You ALSO need specific video cards/capabilities in order to handle the shaders and rendering…and even with a multicore processor, it could STILL take a considerable amount of time!
This is a great article, a lot of good programs listed, but for DIY, anyone interested should take into account learning curves, and computer capabilities. Many graphics programs, even freeware, need certain resources. All graphics need to be rendered in one way or another, and ALL true 3D programs such as DAZ, Hexagon, Bryce, Blender, etc. typically need an Open GL or compatible card capable of running blank-blankity-blank for x-capable shaders, etc.! Multicore processors are almost a must, too. Keep this in mind, because I have learned by experience, you get what you pay for, alternatives are NICE and WORK, but are not always on the same professional level, and you absolutely need a computer able to handle the rendering processes or you will burn out your video card at the least, your processor at worst! And in the graphics industry, timing is everything,and if your competition can put out 3 times as many images because you have a slow machine…..
Thanks.
Let me point out that pretty much nobody reading this is aiming at the graphics industry, high volume output,
I HOPE nobody will want to run 3-D and CGI stuff, thus producing covers that scream, “Clueless amateur”.
Nothing recommended here will strain computers, much less burn them out. I sometimes use Paint.net on a small, retarded HP laptop.
Very informative artical. I have an old limited edition of Photoshop which I love. Unfortunatly it has aquired glitches and as you said the full version is too expencive. It’s good to know there are options for when I it crashes.
Maybe it’s because of the digital photoghraphy class I took or my art background, but I had no problem figuring out how to manipulate and create images. I used it to make bookcovers for a friend. For anyone getting Photoshop, a presure pad is very helpful for things like the paintbrush tool. So is a good book on how to use it.
If you already have MS Office, PowerPoint qualifies as a free-to-low-cost tool. Many professional designers (including this one) use it as the go-to gadget for design sketching, prototyping, mock-ups, and graphic design. The PhotoShop Phan-boys and Phan-girlz and their InDesign and Illustrator buds look down on PowerPointers, but behind the scenes, a fair amount of professional graphic work is found resident in PPT files. And PowerPoint has a much easier learning curve.
For book covers, the completely WYSIWYG, click-preview-drag-and-drop operation is just the thing for those who have to see it to know if it works. The gotchas are in the workflow to create good press-ready output, which requires setup scaling, using hi-res images, not letting PPT sample down, and outputting via PDF at press quality. But that’s all mechanics, not art.
For an example of how far PowerPoint can take you, see my last wrap-around design for CHIPSET at http://www.amazon.com/dp/098437728X/.
I checked out the suggestion to download and install the Photoshop “creative suite” for fee.
Sometimes free just isn’t worth it. I spend hours on it and gave up trying to get it to run.
This is EXACTLY the sort of crap writers don’t need to fool with. Just downloading ran into some of the most obtuse, obnoxious nagging I’ve ever seen. Including giving them your address…. and if you try to fake it, it freezes.
So you finally get it to download. Lucky you.
The package for Windows is over 2000 MB. On my fairly fast server it required over 90 minutes just to download the files.
Then the real hell starts–trying to install and run this thicket of programs.
The “suite” includes Illlusttraion, InDesign (a publiishing program that I regard as an implement of Satan, and useless unless you’re publishing to LSI–if even then)
There was a suggestion on one group I shared this to that in fact that suite only works if you already have older versions.
That’s supported by it trying to get a serial number before proceeding.
(One of several stops in installation and demands for things like installing QuickTime) It wants you to read a bunch of pdfs–all EXTREMELY obfuscated and pointless–such as refering to files as “images”–a total pain in the ass.
I am not the most tech-savvy person in the world, but I’m no idiot eitther. I’ve installed PhotoShop a couple of times. I have never before been unable to install a program before, and never spent so long trying.
I hope I had you at “2000 MB, 90 minute download”. You don’t need this.
Just to compare, Paint.net latest version is under 700 MB downloads pretty much instantly. Instals in minutes.
Now I have to go screw around and get that junk off my computer.
Adobe is not not a good thing for writers. In fact, you’re better off with Foxit than Adobe pdf reader–which has just been found to allow pdf malware into your computer in a very nasty way.
This stuff is for professionals who bring in techs when things hit the fan.
Thanks for all of this, Lin. I’m looking forward to “getting my hands dirty.”