
 I don’t know about you, but I hate it when Microsoft issues a new upgrade to its Office programs, especially Word. I like Word; I use it every day and I know where everything is and what it does. But nooooo, MS has to issue new upgrades so it’s NEW and IMPROVED. It’s like car companies that put out a new version of a car and they just have to put the gas tank on the left side instead of the right side, just so you know you’ve got the latest thing. Blurgh.
But I digress.
Because MS releases periodic upgrades to Word, we often need to update our tutorials, as well. Way back in 2013, Laurie Boris wrote an excellent one on how to use Word’s track changes using Word for a Mac. This tutorial will concentrate on Word for PC. Many things will be similar, but not all.
The first half of this is the editing. You might be doing your own first read-through of your latest book or editing or proofreading for another writer, but in either case, you want to note changes and/or suggestions so they’re easy to see and you can compare the old with the new. First thing you have to do is turn on Track Changes. Click on the Review tab in your top menu ribbon (see red arrow, below), and then click on the Track Changes icon (green arrow). You’ll get a dropdown box with three options. For now, just click on Track Changes (purple arrow). This is a toggle; it’s either on or off. The default is off, so just click the option at the purple arrow to turn it on. 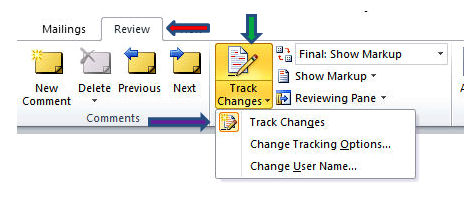
Now, anything you add, delete or change within the document will show up tagged in various ways. If you make a very small change, like adding or deleting a comma or period, it may be hard to notice, but Word gives you clues like this:
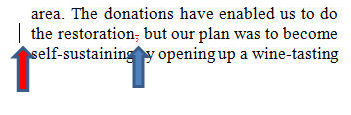
The blue arrow above points to the change itself, which as you can see is pretty minimal. All I did was delete a comma, denoted by the tiny red line across the character space. Because that could be easy to miss, Word also puts a vertical line in the margin where a change has been made (red arrow). As you’re reviewing the changes later, you can easily find them simply by scanning the margins for those vertical lines.
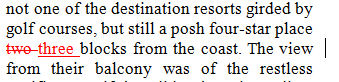
Changing a word or correcting a spelling error is much easier to see. In the example below, Word has crossed out the wrong or replaced word with a red line through it, and shows you the new word, also in red, next to it. You’ll also note the vertical line in the margin, but a couple of red words like this are pretty easy to spot.
Next is making comments. If you have a suggestion for a word or phrase, or a question about usage, just replacing a word may not be sufficient to explain why. I will often offer suggestions, but I like to tell the writer whose work I’m editing why I think a different way might be better. Then, of course, it’s up to the writer to choose what s/he likes best.
First, highlight the word or phrase for which you’re suggesting a change. Then go up to the top menu ribbon and if you aren’t already on the Review tab, click it now. The first icon in that section says New Comment (blue arrow below); click on that. 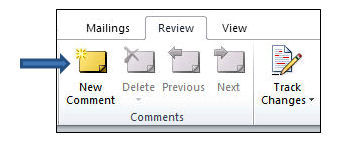
Immediately, Word will highlight the word(s) you’ve chosen like this (below), complete with a dotted line to the comment box, which will be inserted in the margin. In the comment box, you are free to explain your question about the existing word and to add alternatives or suggestions.

Once you’ve gone through the document, save it (I usually save it with a new name, adding Edited or the date to differentiate it from the original) and it’s ready for the writer to review.
If you’re the one who’s just received this doctored manuscript from your editor, now it’s your turn to go through and consider the changes. As always, there is more than one way to do this. You can, of course, simply page through and look for the color-coded entries, comments and the lines in the margins. If the changes are few and far between, there’s a quicker way.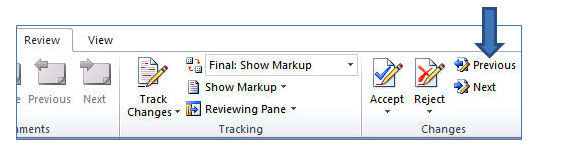
In the Review tab on your menu ribbon, you’ll see Previous and Next in your Changes section (blue arrow above). You can step through the suggestions one by one by clicking on the Next button, or go backward with the Previous button. When you review a suggestion, you can then decide if you want to keep your original entry by clicking on the Reject button, or go with the new suggestion by clicking on the Accept button. That Accept button has a dropdown menu (below) with the choices of: Accept and Move to Next; Accept Change; Accept all Changes Shown; and Accept all Changes in Document. Likewise, the Reject button has a dropdown menu with the same choices, except to reject any or all. I would caution you about using either the Accept or Reject All Changes unless you’re sure you’ve reviewed every notation in the document. 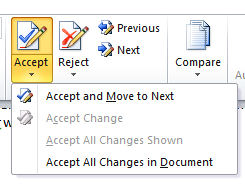
Comments are another story. Since they’re not an either/or thing, not an accept or reject thing, you must again consider each one individually. In the Comment section of the Review tab on your menu ribbon, you’ll see the options below. As with changes, you can step through all comments by clicking on the Next button (or go backward with Previous), and when you’ve taken whatever action you’ve needed to associated with that comment, you can delete it. There is also a dropdown under the Delete icon and you can choose to delete all comments throughout the document, but again, make sure you’ve actually checked them all so you don’t miss anything. 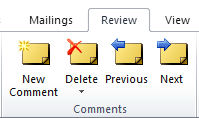
There are more layers to Word’s Track Changes, other tools that are not used as much, but these are the basics. Track Changes is nothing to be afraid of, and can be a valuable tool for writers and editors.
Thanks Melissa. This is the stuff that drives me crazy – changes where there is no need and that require a whole new set of learning.
I know. All these “new and improved” things drive me crazy, too. But –*sigh*– it’s a fact of our technology life.
I didn’t know that about comments! I thought I had to go to each one individually to delete them. This is great! Thank you! 🙂
Hey, always glad to help out!
Thanks for the nudge. My old version of Word for Mac didn’t have “Accept all changes,” but I looked, and presto! The new one does.
Of course, now that I know it’s there, I won’t need it for so long I’ll probably forget where it is. *Sigh*
That sounds oddly familiar, Gordon!