 So, you have a trailer for your book on YouTube. Wouldn’t it be nice if viewers could click on the video screen and be taken to a page with more information on your book? Well, they can. And you can make it happen with the YouTube Video Manager (you need to be logged in for that link to work). All you need is a video on your YouTube channel (it doesn’t have to have been created in the YouTube editor, just be uploaded to your channel).
While it’s great to be able to add a link, the ability comes with restrictions. YouTube only lets you link to a site you own (so you can’t link to your book’s page on Amazon or Smashwords or any other retail outlet). Since most authors have book pages on their websites, it makes sense to link to that page. The book page should include links to all the places readers can buy the book.
Before you can link to your site, the site has to be verified by YouTube. To verify your site, go to the Video Manager 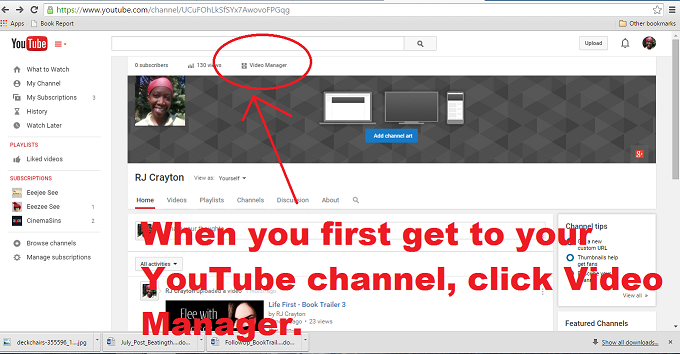 On the left-hand side of your screen, you’ll see an option called Channel, with an arrow next to it. Click the arrow to see the drop down menu. On the drop down menu, click the section called ADVANCED. About halfway down the screen, on the right, you’ll see the option called Associated Website.
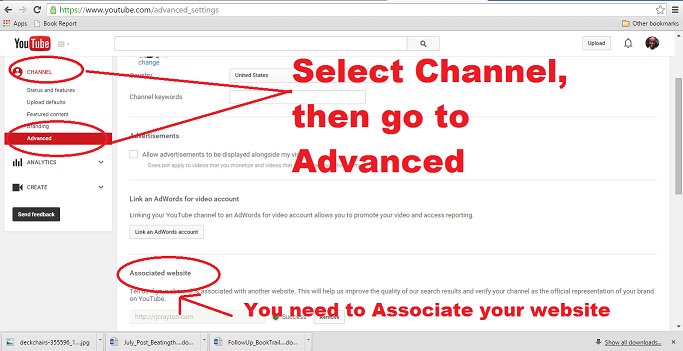 Fill in this section and click the link in order to verify your website.
The verification process can be a bit confusing, so I’m not going to explain it here. If you have a free Blogger-hosted website, you can use this tutorial to verify your website. If you have a WordPress site, follow the instructions in this video. If you have a site hosted through another company (such as BlueHost or GoDaddy), simply follow the instructions Google gives for verifying your site.
Now that you’re verified, go back to your Video Manager and click on Videos.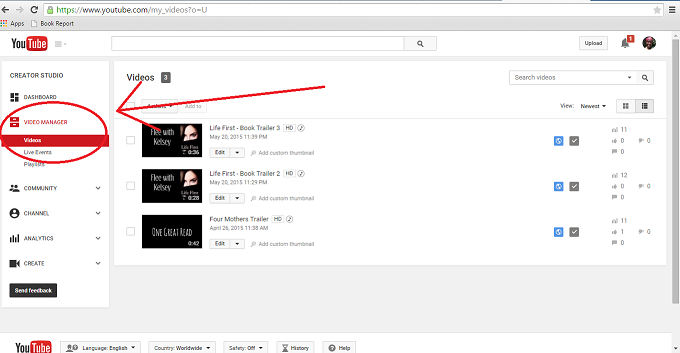 Select the video you wish to add your link to and click edit. Once on the edit page, click Annotations.
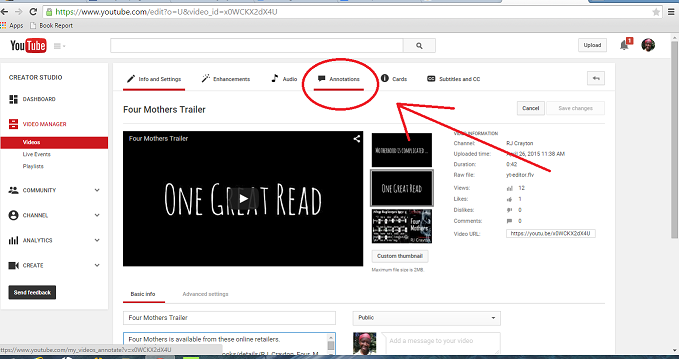 Your video will start to play. Pause it at the point where you want to add the text. Click Add annotation and use the dropdown menu to select Spotlight. Add the text you wish viewers to see. I used: “Available for purchase now. Click Here.”
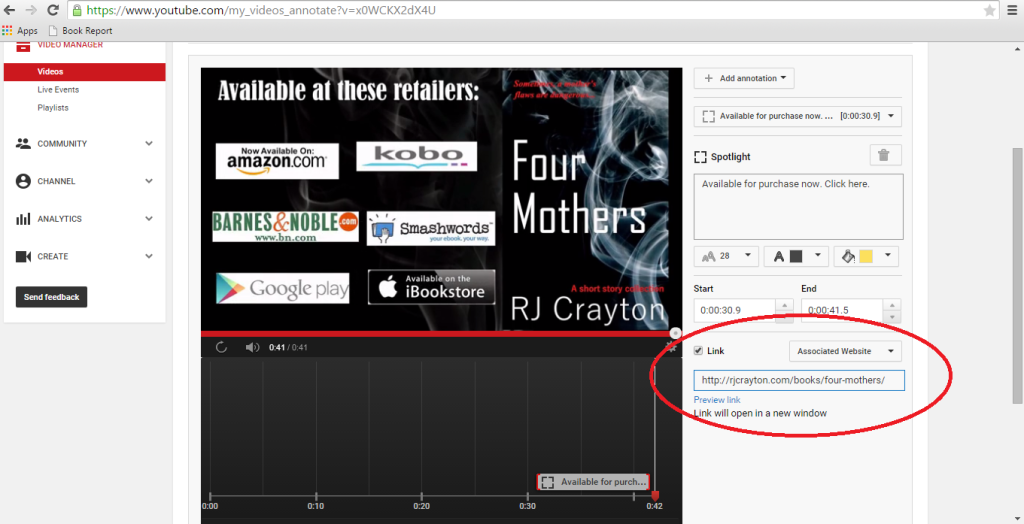
You can use the dropdown menu to adjust the color and size of the font, though these choices are limited. Font size goes up to 28 and color is either black or white. You can move the font box or change its shape by dragging the edges. If you make the font bigger, but don’t drag the edges of the font box to make it bigger, the font won’t increase in size. You can also change the color of the border of the annotation to make it stand out. The border box and font box are different boxes, so be sure to click on the one you want to change. 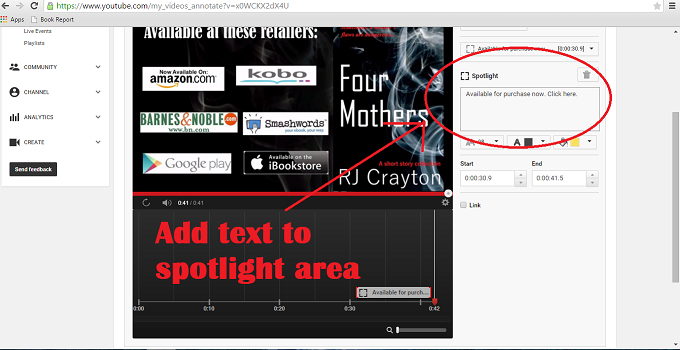 Once your text is in place, it’s time to add the link. Click the box that says link, and a drop down menu will appear. Select “Associated Website.” Now, you can insert a link to the book’s page. If the associated link is working, it will offer you the opportunity to “Preview link.” If it doesn’t work, it will tell you it’s an invalid link, meaning you are trying to link to a page your account is not associated with. [FYI: I first tried to add a link about ten minutes after verifying my site and it didn’t work. I thought maybe there was a slight lag in updating the verification, waited another fifteen minutes and refreshed the page. Only then did it say I had an Associate Website. So if you just the verified your page, you may need to wait a few minutes before it recognizes your site is actually verified.]
  You’re almost done. Now, just scroll down to the video playback bar below. It will show your annotation as a gray box (outlined by some other color). This indicates where your annotation starts and where it ends in the video. If you want your annotation to run for a shorter or longer period of time, click the outside edge and drag your box wider to extend the play time. Drag the box narrower to reduce the play time of the annotation. Then, click Apply Changes.
You can stop there, if you’d like. However, some people have found that they want an extra arrow pointing to the clickable link. If you’d like to do this, then you’ll add a second annotation to the video. On the top menu, click Annotation again. Your video will start to play. Pause it when it gets to the point that your Spotlight annotation is. Now click, Add Annotation, and pick Note from the drop down. Just like the previous annotation, you can select font, size, and shading. You may need to drag the font box to make it larger. If you accidentally restart the video (which I did; hanging head in shame), it seems your font box disappeared. But it didn’t. The font box doesn’t show up until you get to the time where you placed the annotation. For my Note annotation, I used this text: “Click book cover to purchase from your preferred retailer >>>>>>>>>>.” If you’re happy with your note, click Apply Changes. 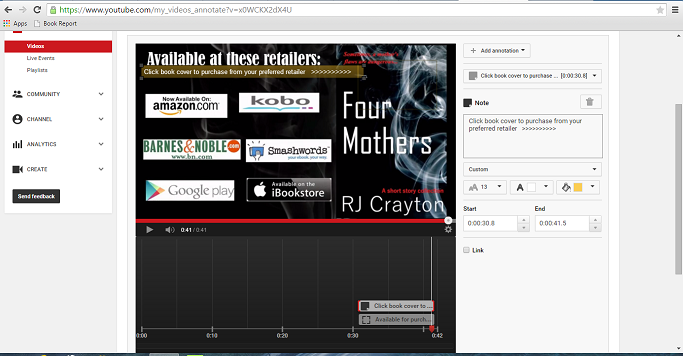 Then you’re done. This is the book trailer I added a link to:
Linking to your page does require users to click one more link. However, if you’re on multiple retailers, linking directly to your site’s book page allows you to provide links to all your sales channels so viewers can pick the one that best suits them. If you’re Amazon exclusive, then your viewers will, unfortunately have to click twice, even though they only have one purchase option.

That looks so cool. I can’t wait to play. Thank you!
Thank you, RJ! I’m going to give this a try.
Who knew? I’m going to put links on all my book trailers! Thanks, RJ!
Brilliant, RJ! Thanks very much. 🙂
Thanks i will try it out.
Thank you for your detailed post, RJ! Pinned & shared. 🙂
Thank you so much. Aren’t you brilliant?
I fiddled with it for awhile and lo and behold, I succeeded. Yay! What I did instead of the spotlight box though, I did a speech bubble, because my background of my trailer is too dark. With the white speech bubble, it shows up more. If anyone wants to see the difference, you can check my trailer for A Cry From The Deep by Diana Stevan youtube.
Also, I have a question re: Google tracking no. I used the one on my website and put it on my Youtube video of my book trailer. Wondering if this was right. Anyone know.
Yay! I’m glad it worked for you.
As to the second thing you mentioned, I’m not sure what you mean by Google tracking? What is it, and how did you use it in relation to the video?
P.S. I like the way the speech bubble looks. That’s very nice with the white background.
Thanks. I like who the speech bubble looks, too.
As for the Google tracking, there was a spot in the youtube video manager section where you could fill in the Google Tracking number. I recalled I had one on my website and assumed that if I entered my Google tracking code in the youtube section it would raise my visibility there.
I don’t know whether I should’ve done that or not or whether I’m confusing Google searches on that score. Maybe the tracking code I have on my website is for that alone. Anyone know?
I had never heard of the Google tracking code, but I guess I should learn more about it. I did find this on how the tracking relates to YouTube. https://www.klipfolio.com/blog/connect-youtube-channel-google-analytics
I don’t know if that’s helpful to you, though.
Thanks RJ. Very helpful. So much to know.
Great tutorial, RJ. If I was to ever make a trailer, this would be the most useful thing to know. 🙂