
 Yes, some authors are still making video trailers – it’s just one more way to get word out about your books (*ahem* you know it’s all about effective frequency). Here at Indies Unlimited, we’ve got an entire resource page dedicated to trailers. We even have a video trailer-fest from time-to-time. So yes, the video trailer is still going strong. Yet – one of the most overlooked tools for making a book trailer is Microsoft Office: PowerPoint. Stick with me, and I’ll show you how easy it is.
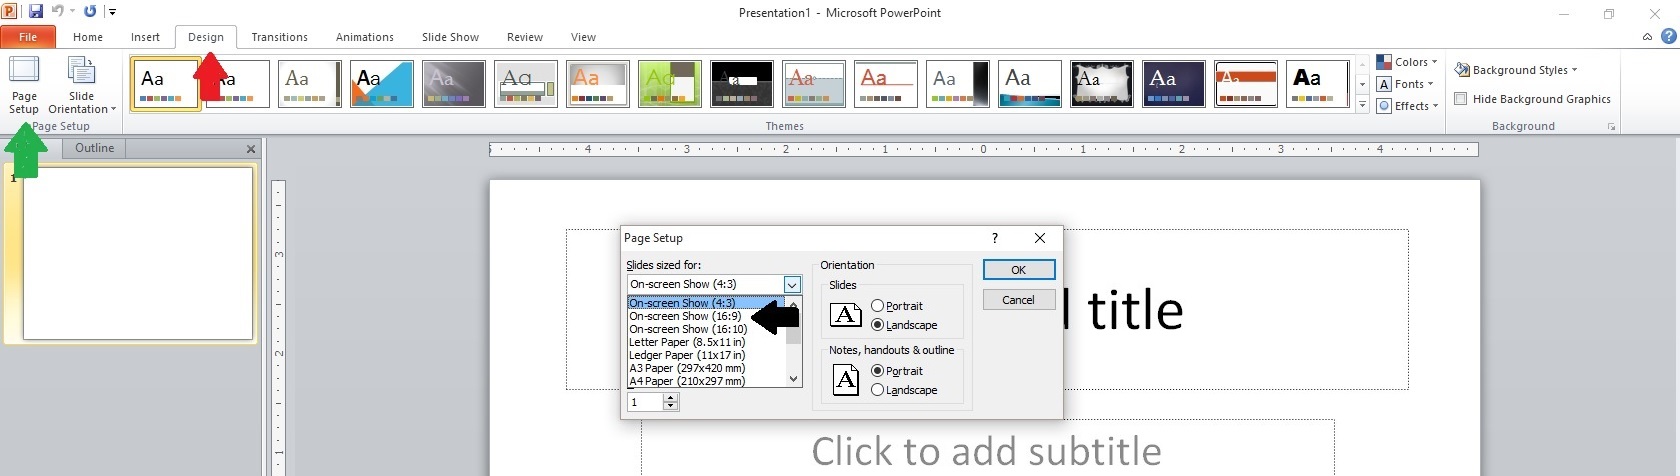
Open PowerPoint, then open a new project and go to Design (red arrow below), then Page Setup (green arrow). Choose “Slides sized for” at the dropdown (black arrow), and select “On-screen show 16:9.” This sets the project to widescreen and leaves out the black side stripes you sometimes see on YouTube.
Step 1:
I wanted a moving background, so I went to MotionBackgroundsForFree.com, clicked on “Free Backgrounds,” and searched until I found one I liked. (You can find links to motion backgrounds and other handy sites on our Free Graphics Resources for Authors page.) I downloaded and saved to my computer, then back in PowerPoint, I went to the toolbar and clicked Insert (red arrow below), and then Video (green arrow below). I chose “Video from file,” browsed my computer until I found the video I downloaded, and double clicked to insert it into my project.
Step 2:
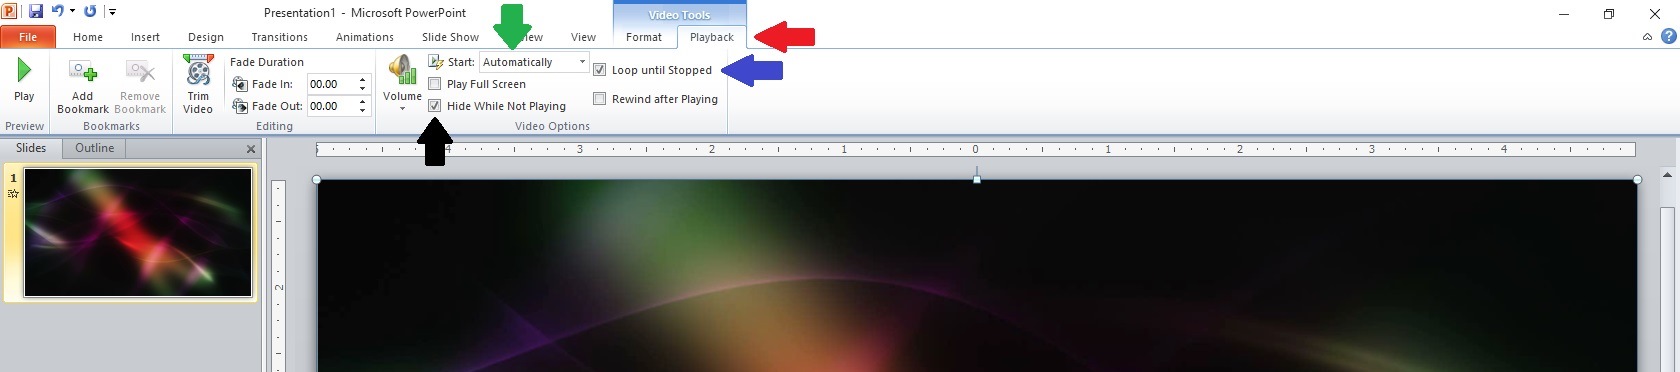
 Go back to the toolbar and click Video Tools (red arrow below), and then “Playback.” At the dropdown (green arrow below), select “Automatically.” We want the video to begin playing without having to click anything to get it to start. Check the box next to “Hide While Not Playing” (black arrow below). We don’t want our audience to see any weird graphics like speakers or cameras that might show up in our inserted video. Then check the box next to “Loop until Stopped” (blue arrow below). This will make the video continue to play as long as we’re on this particular slide.
Step 3:
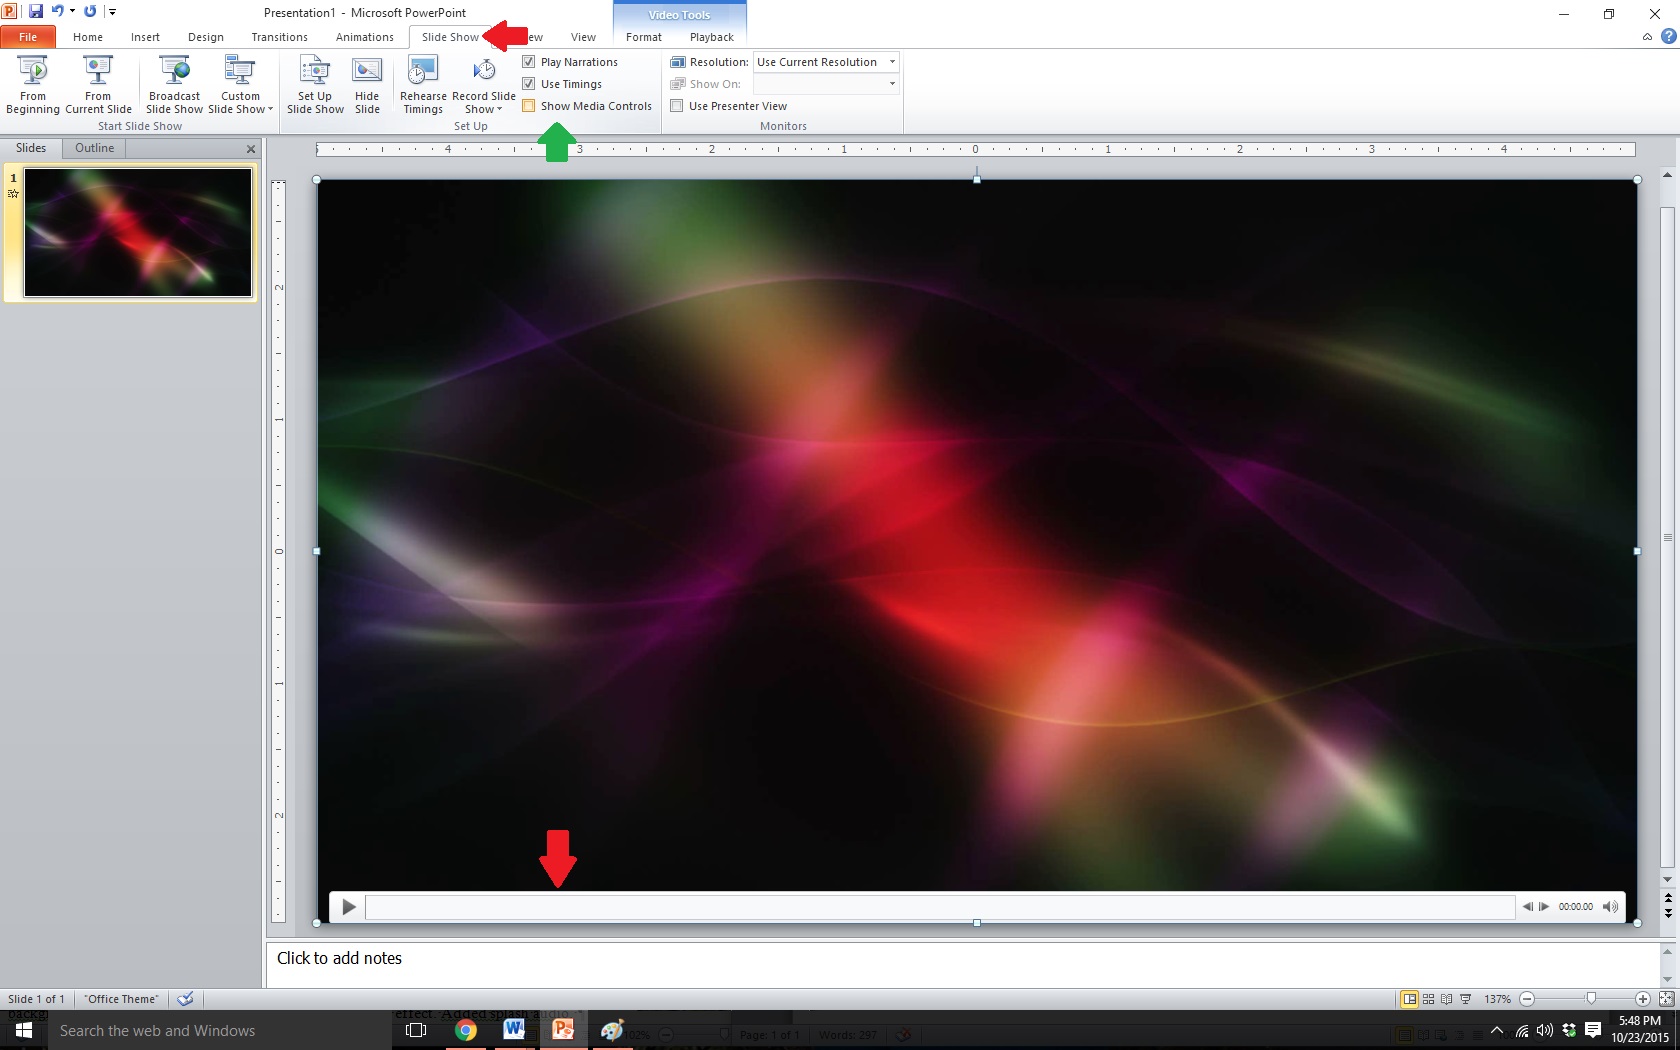
 Next, go back to the toolbar and click Slide Show (red arrow below). Click on the box next to “Show Media Controls” (green arrow below) to uncheck that box.
Step 4:
 This will remove the play bar (red arrow below) at the bottom of the video. We don’t want it showing during our book trailer.
Step 5:
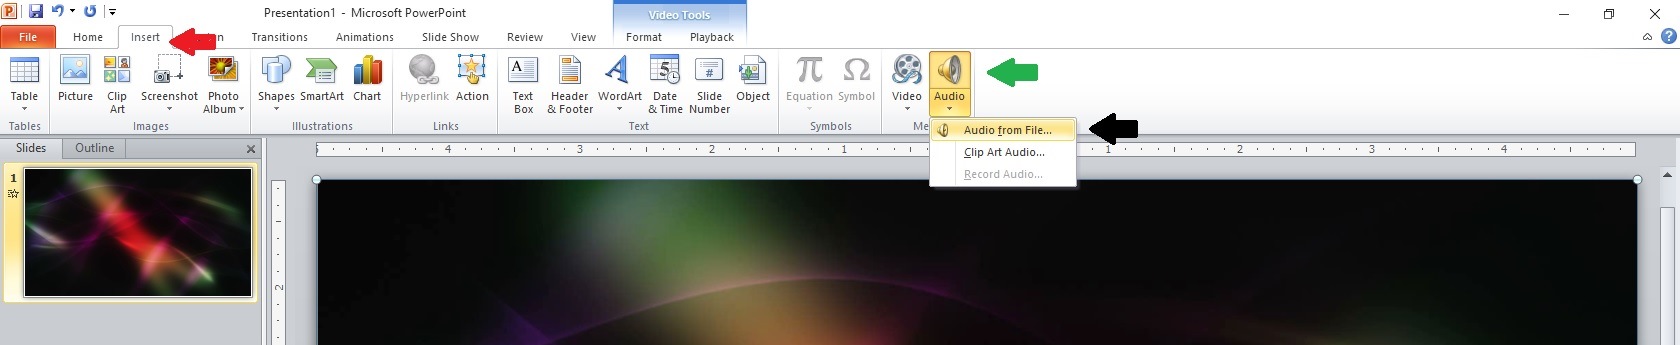
 Next, we need music. I went to Bensound.com this time (there are many other sites you can use – and I list some on my free resource page here) and selected free music under a Creative Commons license. Learn more about licensing here. I downloaded the music to my computer, went back to my PowerPoint project, and chose Insert (red arrow below) again on the toolbar. Instead of “Video,” this time I chose “Audio” (green arrow below), and “Audio from file” (black arrow below). I searched my computer for the audio file and double-clicked to insert it into my project.
Step 6:
 You’ll notice a speaker graphic on your slide (red arrow below). We want to get rid of that. On the toolbar click Audio Tools (green arrow below), and then “Playback.” Just as we did with the video we inserted, select “Automatically” from the dropdown (black arrow below), click to “Loop until Stopped” (blue arrow below), and click to “Hide During Show” (orange arrow below). I want my music to fade out at the end of the slide instead of stopping abruptly, so I went up to “Fade Out” (purple arrow below) and set the time to three seconds, which will make the music fade over the last three seconds of the slide.
Step 7:
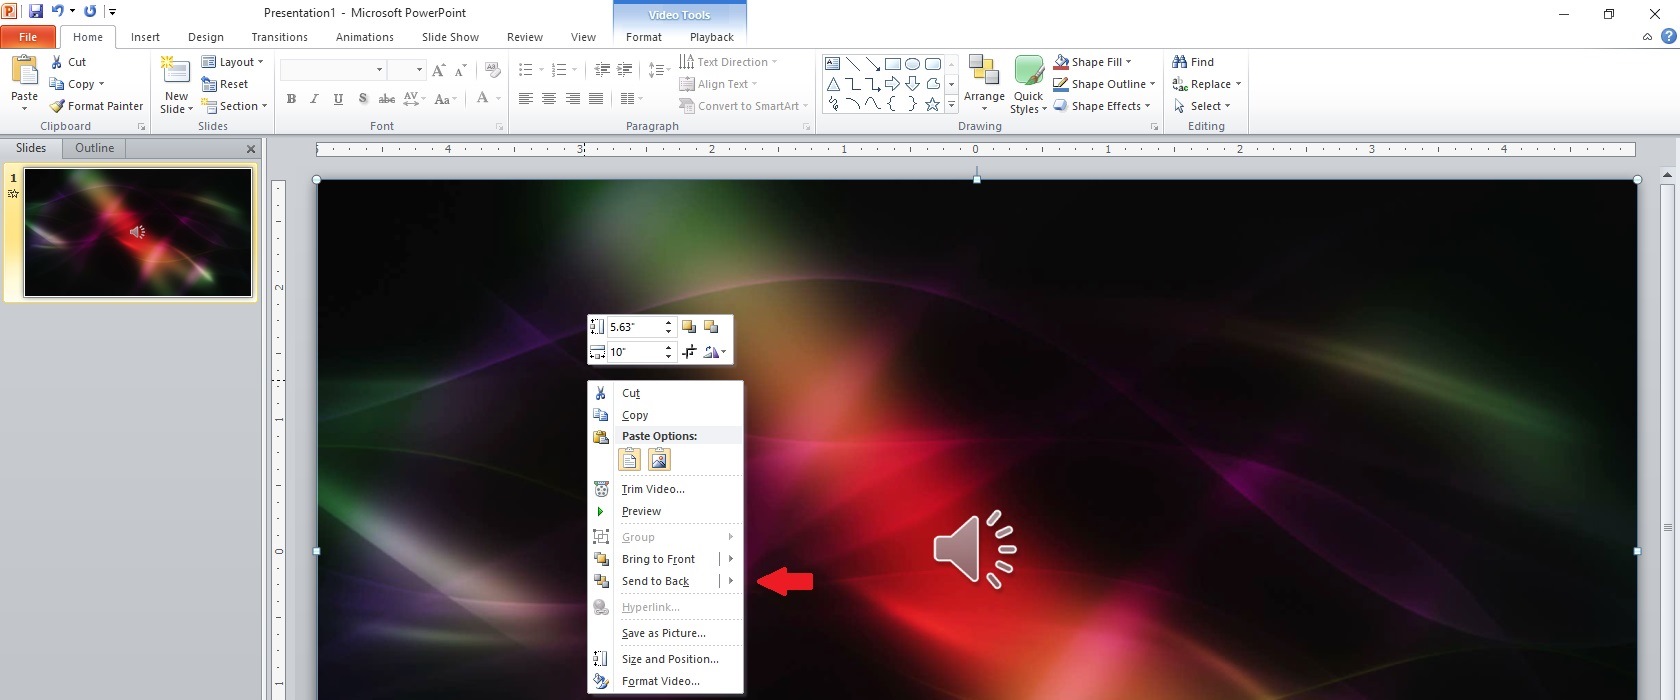
 Now we’re ready to insert words and graphics. Right click anywhere on the slide and a menu will pop up. From that menu, click “Send to Back” (red arrow below). That will send our video to the back of the slide so we can insert words and graphics on top of it. It will also bring up the two textboxes that were on our blank slide in the beginning. I want the top textbox further towards the top, so I click on the corner of it and drag it there. I want the bottom textbox lower on the slide, so I click and drag it lower. When you click in one of the textboxes and go to Home on the toolbar, you’ll see all the text options you see in Word: font styles, colors, size, etc. Choose whichever attributes work best for you.
Step 8:
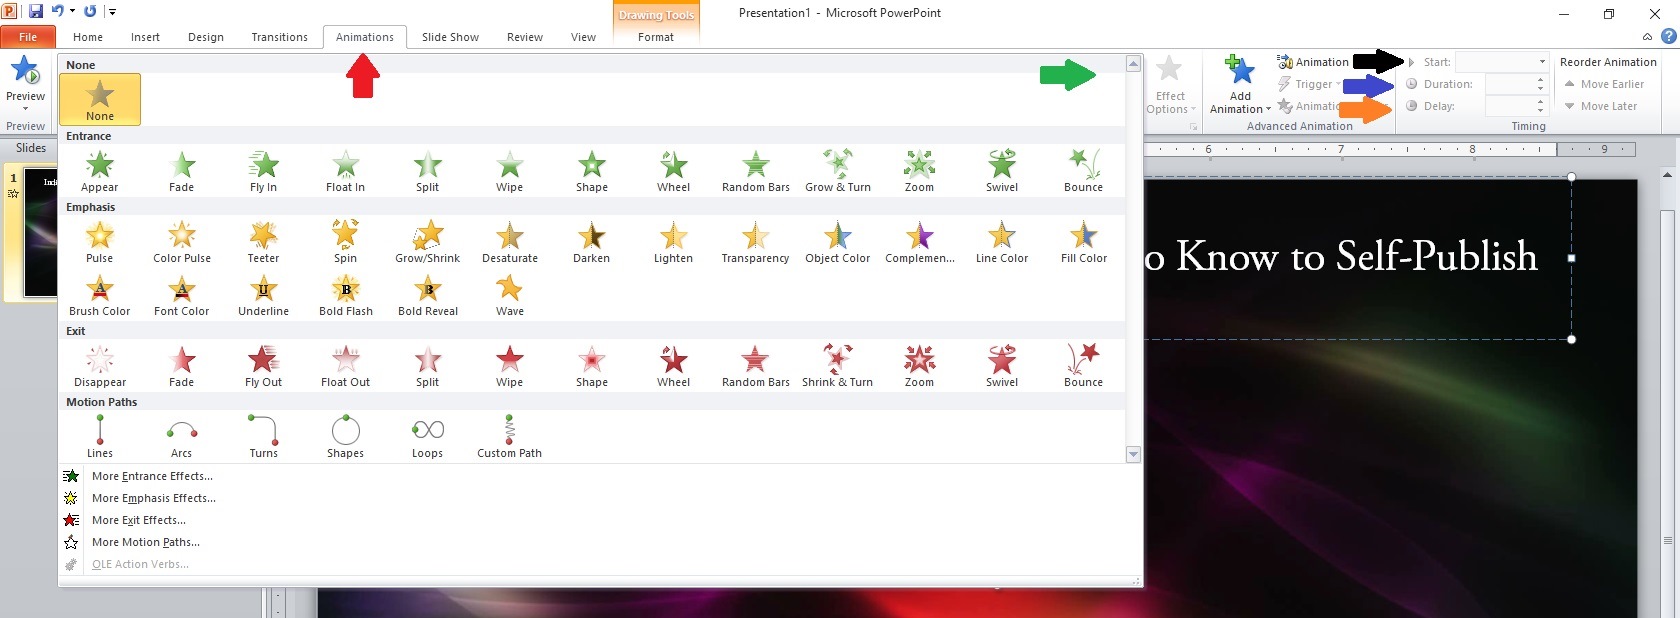
 In the top textbox I typed “Indies Unlimited: Everything You Need to Know to Self-Publish.” I didn’t want it to just appear on the slide; I want to add some animation. We’ll use this next screenshot for all of our animations on this slide. Up on the toolbar, click Animations (red arrow below). You’ll see a bar of various animations, but I wanted more than I could see in that bar, so I clicked on the dropdown arrow on the right side (green arrow below), and that brought up more variety. I chose “Swivel.” Over on the right, I set it to “Start with previous” (black arrow below). I set the “Duration” (how long the animation lasts) at two seconds (blue arrow below). I set “Delay” (orange arrow below) at two seconds. This means the words will appear two seconds after the video and music start.
Step 9:
 You can check your timing, animations, etc., at any point by clicking the icon to start your show (red arrow below). I do this several times to make sure my timing, etc., is right.
Step 10:
 In the bottom textbox, I typed the names of all the IU minions. I went back to Animations (Step 9 screenshot above) and chose “Spiral in” for the effect. Again, I set it to “Start with previous,” and set the “Duration” at two seconds, as well as the “Delay.” This should make the second textbox spiral in two seconds after the first textbox swivels in.
I then added photos of the minions. From the Insert toolbar shown in Step 1 and Step 6 above, choose “Picture,” find the picture in your computer, and double-click to insert, dragging it to the location on the slide where you want it to appear. From the Animations screen (Step 9 screenshot), I set each photo to “Start with previous,” and set the “Duration” and “Delay” both at two seconds. I played around with animations, choosing “Bounce” for the first few, then “Boomerang,” “Curve Up,” and “Pinwheel.” Each photo’s entrance lasts two seconds, and each photo appears two seconds after the previous.
I next inserted a textbox (see Step 2 and Step 6 screenshots above to Insert) introducing K.S. Brooks and animated it the same way, before adding her picture. I did the same for Stephen Hise. My last animation for this slide was a textbox, also animated, giving credit for the video and the audio.
I almost left it there, but realized I should show how to add another slide. Over in the slides screen to the left, right-click at the bottom of the slide you’ve been working on (red arrow below) and choose to add a new slide.
Step 11:
 I wanted a design style that matched my first slide, so I went to Design, then went to “Colors,” and chose the palate that best matched. (Step 12.)
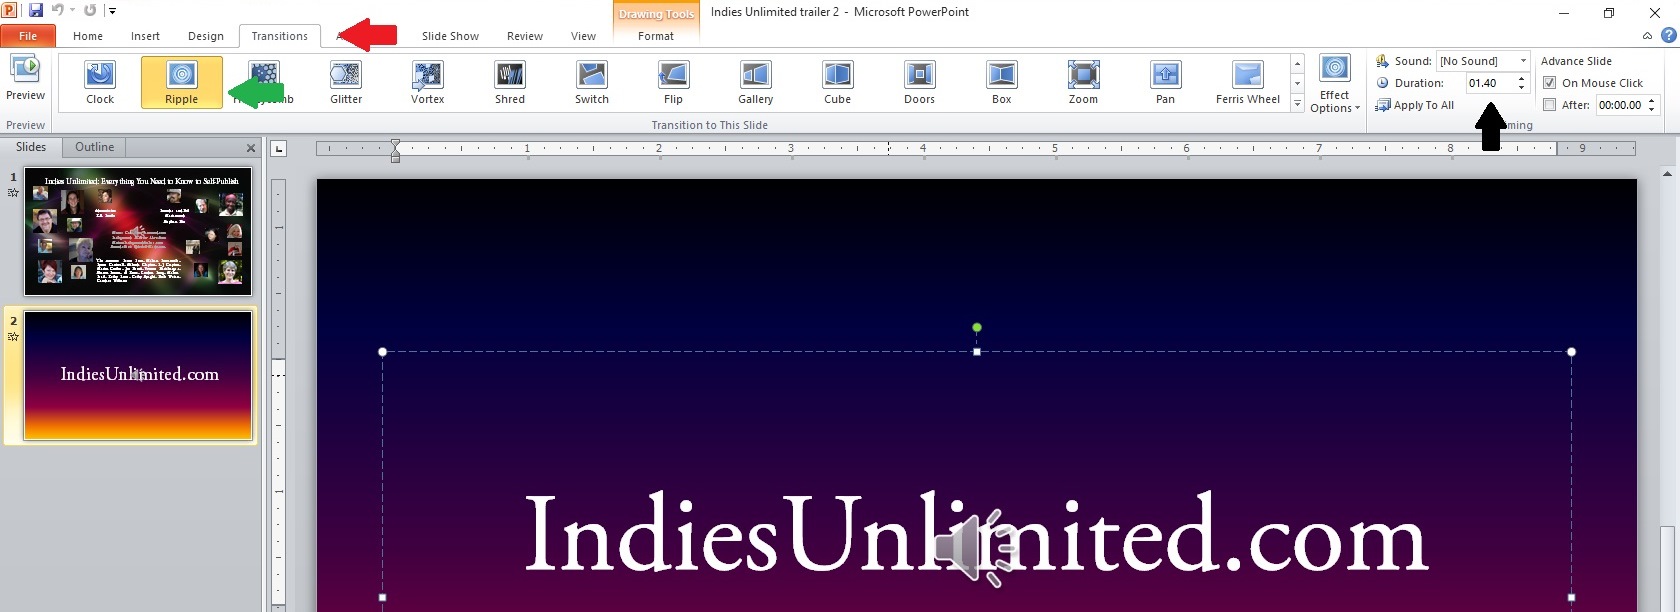
I wanted to transition the slide in a nice way, so I went to Transitions on the toolbar (red arrow below) and chose “Ripple” (green arrow below). I set the “Duration” to 1.40 seconds (black arrow below). This should make the transition from our first slide to our second slide appear as a ripple in water.
Step 13:
 I thought a sound effect would be the perfect ending, so I visited MediaCollege.com and downloaded a “splash” sound onto our last slide. As we did earlier, I inserted it into that slide (see Step 6 screenshot above). And, as we did with our music, we need to hide the speaker graphic (see Step 7 above, and “Hide During Show”).
Now save this whole thing as a Windows Media Video file (.wmv). It sounds complicated, and it requires some playing around with timing and animations, but the end result …. Well, see for yourself:
Oh that’s great! Love the sounds effects and everything – well done!
Thanks, Candace! I had no idea PowerPoint could be used this way until I was helping my son with a social studies project a couple of years ago. 🙂
Really interesting. I didn’t know you could do trailers in PowerPoint. I’ll have to give it a try.
It takes some playing around, but once you learn where everything is, it’s actually a lot of fun.
Very cool.
Thank you!
Thank you, Melinda. Quite informative.
Thanks for stopping by, Phillip!
You’re my hero. I’ve been looking for a program that would let me overlay still photos over video for my trailers for longer than I want to admit. And it was on my computer the entire time… sigh. 🙂
LOL, glad I could help! One place with free motion backgrounds is listed in the article, but I recently found another one: Videvo.net. Be careful if you use it, though – the first few videos they show you (on a slightly darker background) aren’t free. You have to scroll down to get to the free ones.
Me too. I know how to use Power Point to a basic level, but never imagined the old workhorse could be used to make something this sophisticated! Bookmarked. 🙂
You can get even snazzier with it, but my post was over the word limit as it is!
I’ve done all my book trailers with PowerPoint and had a ball doing it. Great tutorial.
Isn’t it fun? I can get caught up for hours playing around with it. 🙂
Thanks, Melinda. Great tutorial. 🙂
Thanks, A.C.! 🙂
I would love to try my hand at this! I’m stalling! thanks so much for such a detailed demo and great video.
You’re welcome, Ester, and good luck! When you get it finished you should come post it here during the next trailer-fest. 🙂
Thanks so much, I hope I really will get it done.
This is awesome! I’ve been playing with a variety of affordable ways to create a book trailer. Your instructions are very clear. I can’t wait to try this out! Thank you for sharing this.
Kori
Thanks, Kori, I hope it works well for you! The key to it is really in becoming familiar with how it all works – the animations, transitions, etc. I’m sure there’s still stuff I haven’t discovered, but I’ve had a lot of fun playing with it. 🙂
Melinda-this is amazing! I opened PowerPoint immediately to start a book trailer project. Your instructions are perfect. Thanks much.
Glad it’s helpful, Maureen – good luck!