 Last week, we talked about the functionality enhancements by Amazon so that folks can install a ‘Look Inside’ preview directly onto their blogs. This week, I’m going to show you how to do that.
Before I begin, a disclaimer: this tutorial will only work on WordPress blogs that include sidebars and have the option to display images. [Sidebars are narrow columns that can appear on either side of the main posting area]. I have used my own blog for the screenshots and it has two sidebars with pictures of my books displayed in the second sidebar [see below]:
 In this tutorial, we will take those static images and turn them into interactive ‘Look Inside’ portals.
For your shopping list you will need:
- A WordPress blog
- Images of your books displayed on the blog
- And of course, you will have to have your books available on Amazon
Part A – on Amazon
Step 1 Find your book on the Amazon website [you do not need to be logged in].
Navigate to the main Amazon page for your book [where the reviews and buy options are] and look for a small, blue <Embed> option near the bottom of the right hand side of the page:
Step 2 Click the <Embed> option. The following dialogue box will open: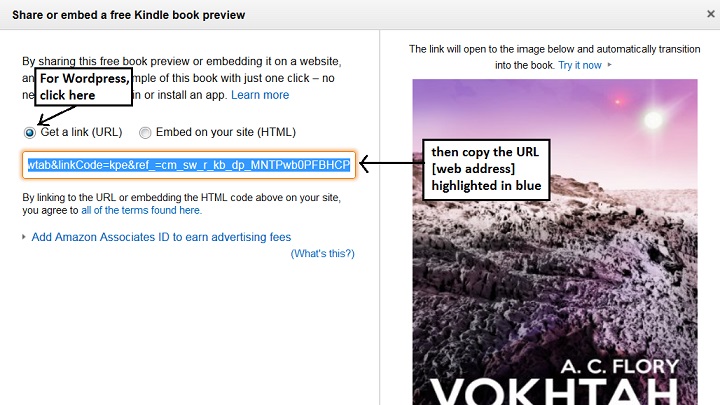 Step 3 Click the ‘Get a link (URL) button as shown in the screenshot above.
Step 4 A URL will display in the box as shown.
To copy the URL, click inside the box. When the URL is highlighted in blue, press CTRL + C [together] on your keyboard. This will copy the URL to the clipboard, ready for you to paste in your WordPress blog.
Part B – in WordPress
Step 1 Log in to your WordPress blog. It will show the Reader by default.
Step 2 Click the ‘My Sites’ button at the top left of the page [as shown below]:
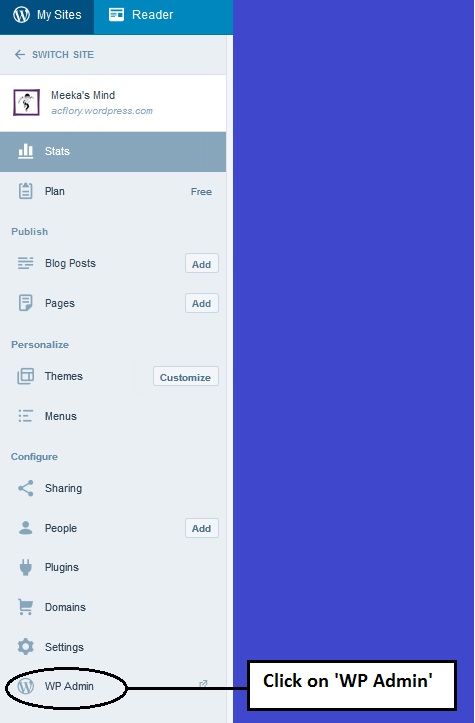
 Step 3 You should now be looking at a page with a lot of options. The one we want is called ‘WP Admin’ and it’s found right at the bottom of the left hand pane:
Step 4 You are now in the engine room of your blog. On the left is a navigation pane full of yet more options. About 2/3 of the way down you will find one called ‘Appearance’.
Click it to display a sub-menu of further options. This time click ‘Widgets’: 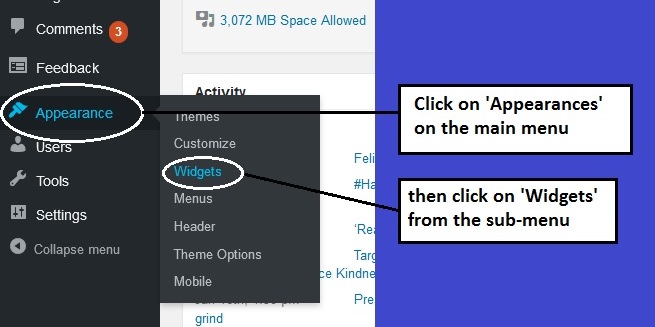 You should now be looking at a page like this: Open whichever widget area contains the image of your book
[Note: in my blog the images are all in the Secondary Widget Area circled in red above].
WordPress does not display the name of the image in the widget area so find the correct image and open its dialogue box [by clicking the small arrow next to it]: 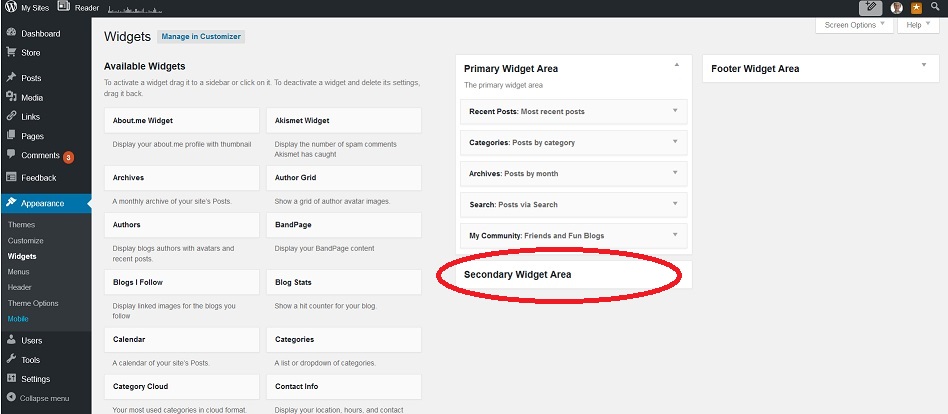 Open whichever widget area contains the image of your book
[Note: in my blog the images are all in the Secondary Widget Area circled in red above].
Step 5 WordPress does not display the name of the image in the widget area so find the correct image and open its dialogue box [by clicking the small arrow next to it]:  You should now be looking at the image dialogue box:
 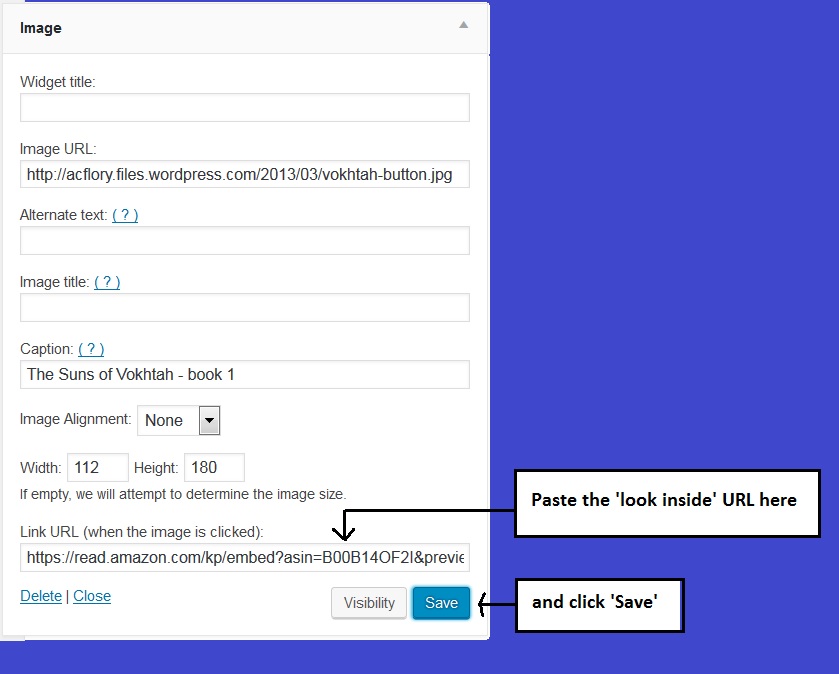 The ‘Link URL’ box should be empty. Click inside the box and press CTRL + V [this will paste the web address you copied from the Amazon into your blog].
Step 6 Click the ‘Save’ button to save the new URL, and then click ‘Close’ to exit from the image dialogue box.
And that’s it. Congratulations! The image of your book has now become a portal to the Amazon ‘Look Inside’ page!

Fantastic–even this Luddite followed that. Thanks millions.
Now if I only had a website. 😉
-grin- You could always create a WordPress blog [or a Blogger one]. It’s a great way to have the benefits of a website without [most of] the headaches, including the cost.
Kerry, you might find this article by the lovely Carolyn Steele helpful: https://indiesunlimited.com/2013/04/10/but-i-dont-want-a-blog/
Thanks KS – I was only kidding. My very excellent web guru does all that stuff for me. 😉
My web person is just terrible. Someday I will have to fire myself. 😉
This is fantastic. I have this topic in my post idea queue in the next month or two, but how can I compete with this? I think a reblog is in order 🙂
Are you just going to cover widget use, or will you be doing a post on how to embed the code into a web page as well?
Worked like a charm. Many thanks for this great tutorial.
Thanks for this. Unfortunately it does not help me. A while ago I successfully added my latest book to the side bar using this Amazon link. Try as I may, I cannot get it to work for a second book. Any further advice would be welcome!
You can also add your sales associates ID if you want credit for the sale from anyone who buys the book after clicking the preview link. Use the choice to add it with the option below the get a link dialogue (or just add your ID code at the end of the link) Also, you can also add the preview option to any other link, like your signature or anywhere else you want to show the preview option.
Hi Everyone,
Most of the books I sell are large print paperbacks, so I just checked to see if it worked with my kindle and paperback books, I am sorry to report that I found this somewhat limited and a bit lacking, but if the is working for you it can be a good promotions tools for you, and saves you from needing to put sample .pdf file pages on your blog or website:
1) This appears to only apply to your specific kindle book page and does not have an for the CreateSpace paperback book page,
2) My short 28 page illustrated children’s book on kindle displays the message “Preview Not Available No Kindle book preview can be shared for this book.” even though there is a too short inside look available of 3 pages. Maybe it is just to short so there appears to be a minimum page limit.
3) My 52 page poetry book “Our Seasons of Ardent Love” does have a working link on the kindle page. As do my longer books, but the is still not available for the paperback book page.
4) It appears anyone can copy and use this link to link to the Look Inside in your kindle page on amazon. So it may help your reviewers when they post to their web pages or review sites and blogs about your book.
I hope this helps some of you.