Making a folder for People, Places, or Things in Gmail
Ack! So many emails! How do I keep track of who is sending me what? I create a folder, that’s how! Creating a folder and moving your emails to it is very easy. There are two different ways you can do this.
In Gmail, just to be different, folders are called “Labels” – perhaps because you put labels on a folder? I dunno. Let’s just run with that, thought.
If you, let’s say, want to make a “filing cabinet” for a certain subject, you need to do that first. So, let’s make a label called “writing.”
Let’s start with the more direct way of creating a “Label” (herein known as folder).
Scroll over to the left sidebar and mouse over it. That will extend the screen a bit and will reveal the word “More” (see pink arrow). 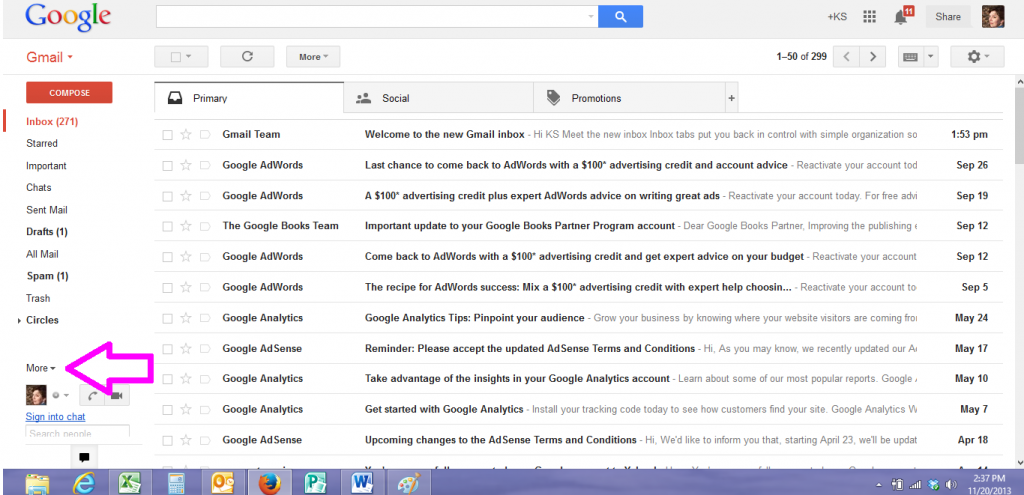
Click on “More.” That will bring up a new screen (below). 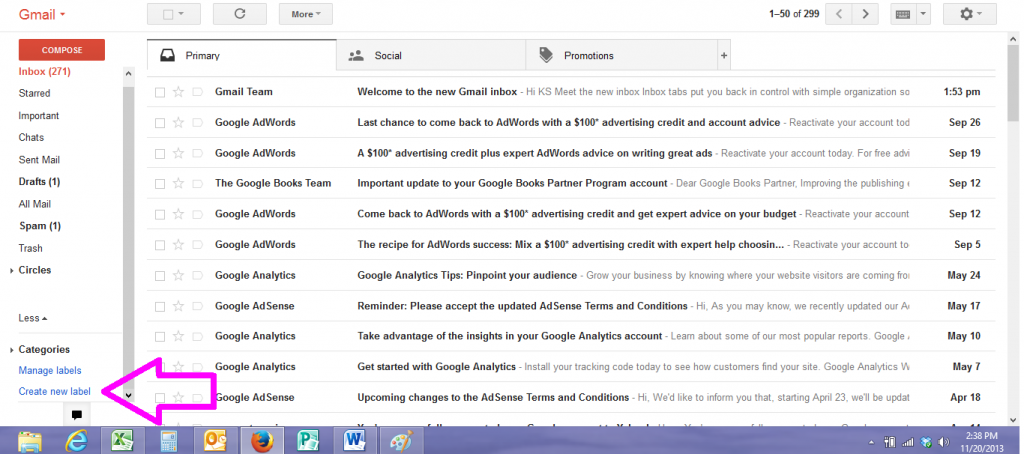 Click on “Create new label” (see pink arrow above). That will bring up the next screen:
 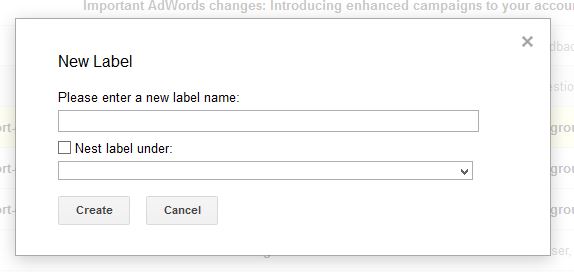 Fill in the information – how you want the name of your “Parent” folder.
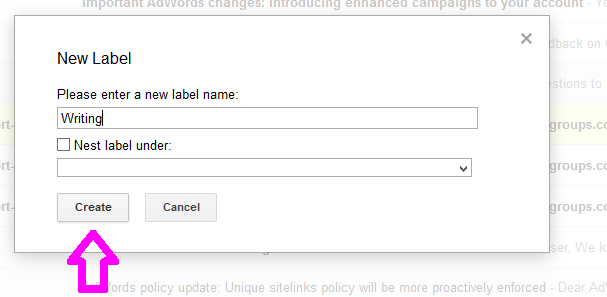 Then click “Create.” And voila! You’ll get a message from Gmail at the top of your screen. (Good thing, because that left sidebar folds up again!)
 Now, we’re going to make a “sub directory” or as Google refers to it – a “nested label.”
Take your mouse right back on over to that sidebar. Do the “More” thing again (if you have to. It may not have folded back up all the way).
Next to the writing folder, you will see a tiny dropdown arrow. Click on that. You will get a little pop-up window.
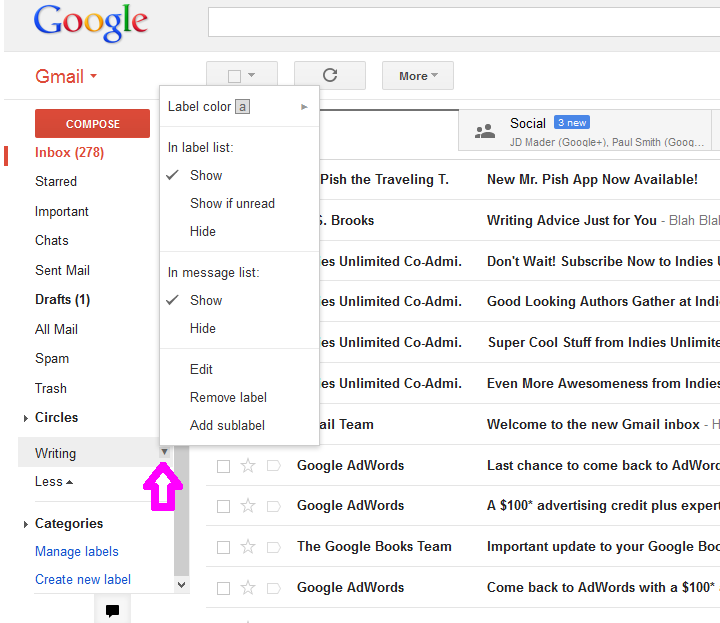 Now, while we have this little menu open, how about we make things pretty and change the “Label” color for the Writing folder? Click on Label color up at the top.
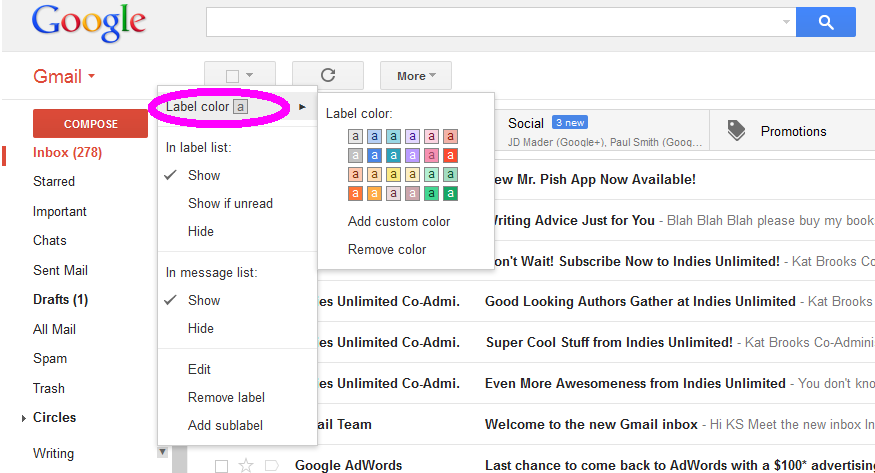
Let’s make the writing folder green (since writing makes us so much money!), shall we? Or, click on whatever color you want. Yes, the stupid sidebar will collapse again and yes you’ll have to mouse over it to get it to expand. Also, no, you didn’t do it wrong. Coloring the label doesn’t actually change the color of the “Writing” folder. It just adds a stupid green square to the right of it.
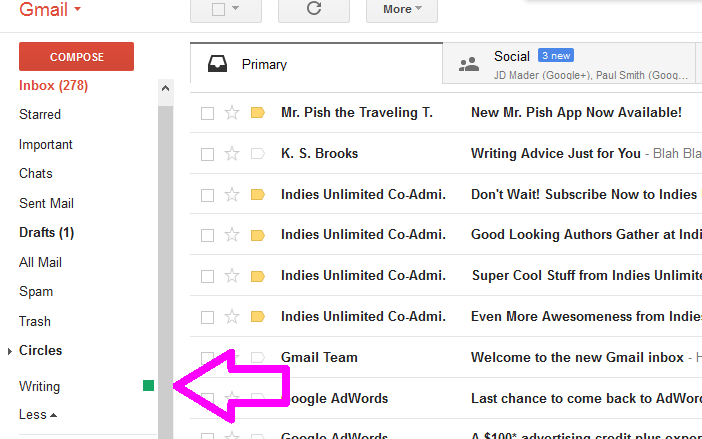 Well, I know I certainly couldn’t survive without that silly green square there. Now let’s get back to adding a sub-folder. Click on the stupid green box and that will bring up that same pop-up window.
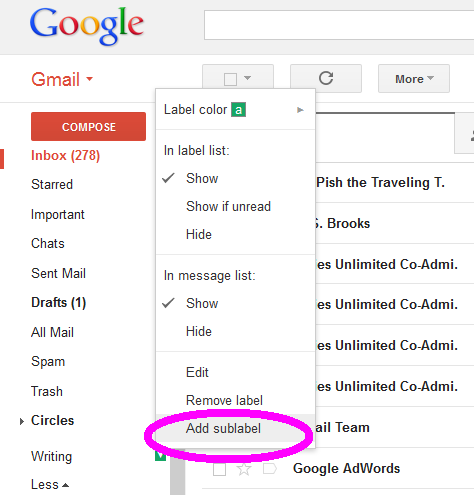 Click “Add sublabel.”
Since I have a number of emails from the awesome website Indies Unlimited, I’m going to add that as my first subfolder. Then click Create.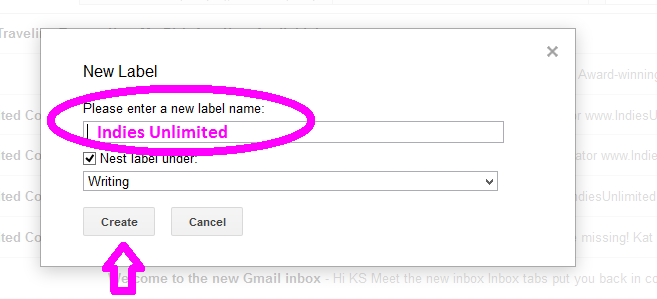
Of course, Gmail has collapsed everything again. So go back over to the sidebar and wake it up.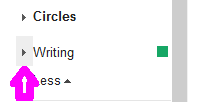
Click on the sideways carrot to the left of “Writing.”
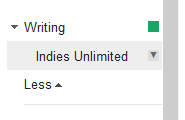 And that’s where you’ll find your new Indies Unlimited folder! Now, we are going to move some emails into that folder.
Since I have four emails from Indies Unlimited, I’m going to do what some sites refer to as a “bulk action” (since I’m selecting more than one item). Choose the emails you want to move and click the box to the far left of the email which will make a little check mark appear.
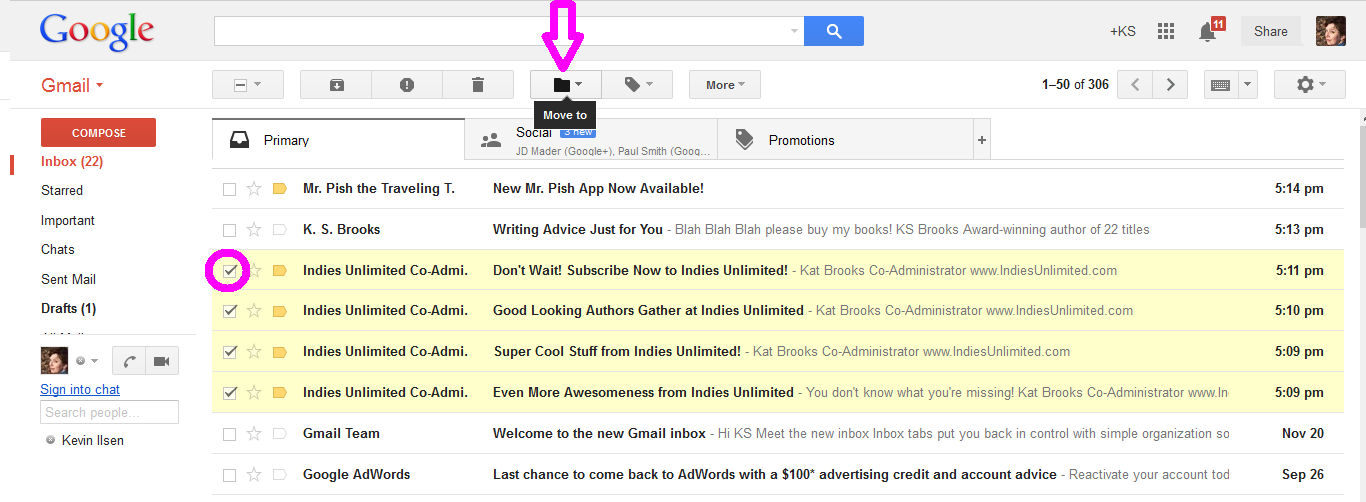
Once you’ve selected the emails you want to move, scroll up to the black folder in the task bar. If you mouse over it, a little black pop up will appear which says Move to. You know you’re in the right place. Click on that. Another window will appear, giving you choices as to where you would like to move your emails.
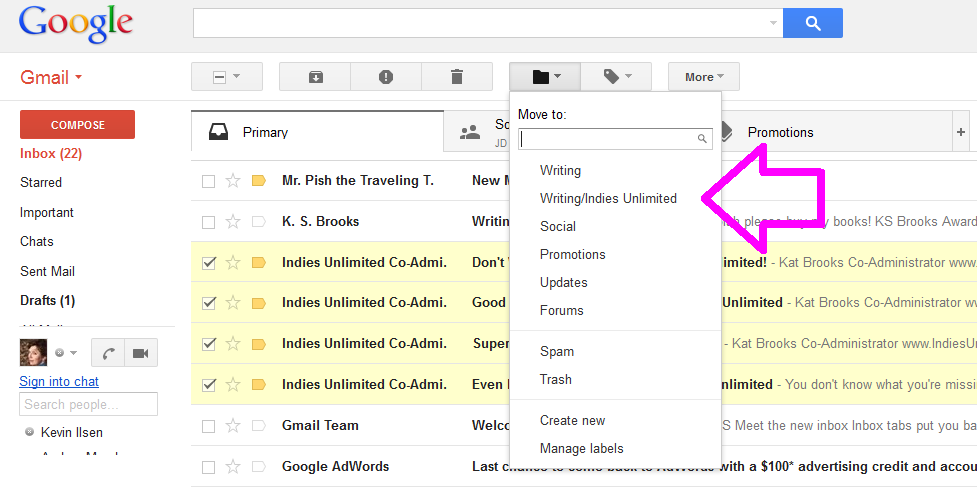
And we know we want to move those 4 emails into the newly created Indies Unlimited folder. So click that.
As always, Gmail will let you know you’ve done what you set out to do by showing a handy dandy message at the top of the screen.

Now the messages have disappeared from your inbox and are safely stored in your new nested folder. Congratulations!
You can also set up a folder “on the fly” from the inbox. This is handy if you don’t feel like dealing with that annoying disappearing sidebar.
Select the email you want to create a folder for by clicking the little box to the left of that email:
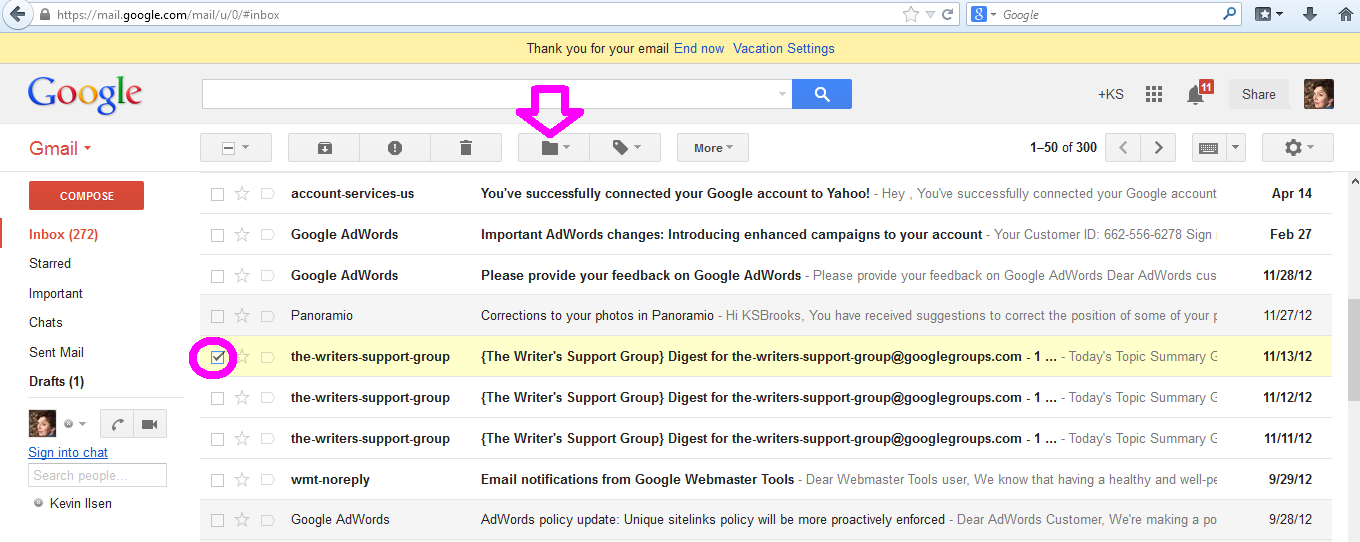 Then mouse up to the black folder icon. You know the drill from here.
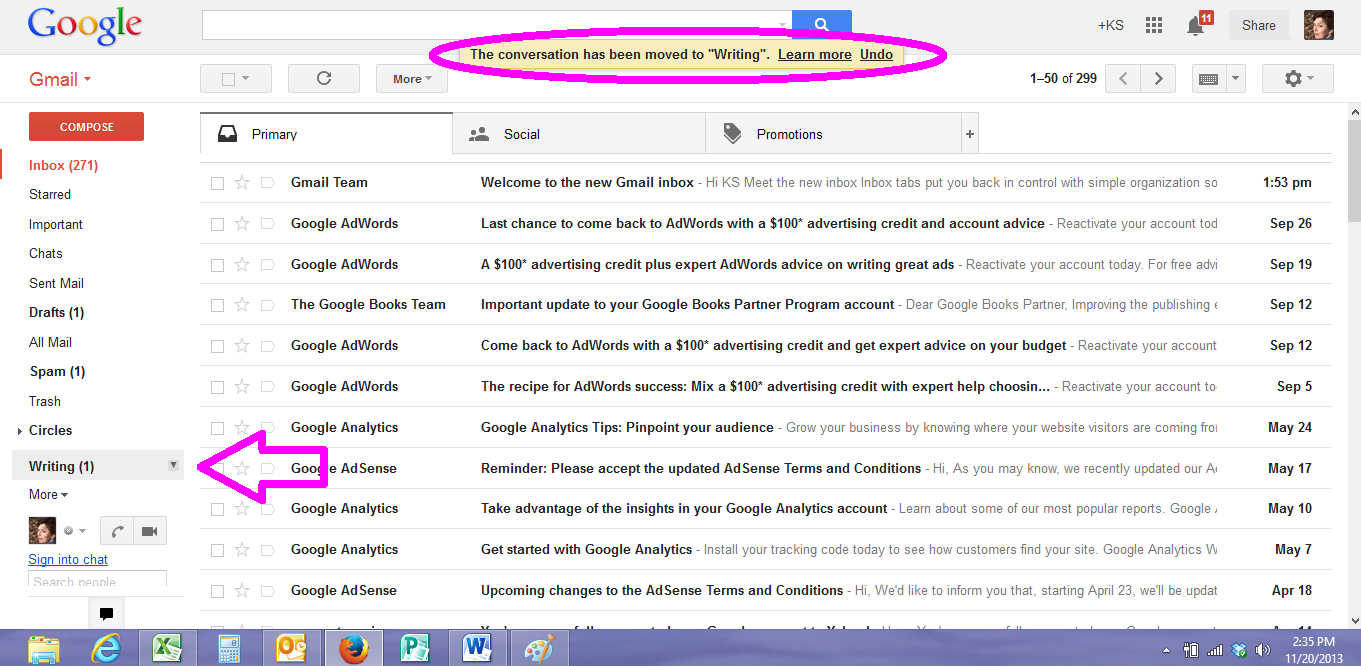
Now get that mailbox organized!

Great tutorial, Kat. Thanks!
Thanks, DV! I mentioned to someone they could put emails in folders and they had no idea. I hope it’s helpful to those who weren’t aware of the function.
Cool. I had the first part down but there’s a whoooole lot more here. Thanks.
You’re welcome! Next I’ll be doing one on “out of office” messages and how to put in your signature.
Good stuff, Kat. 🙂 What I always forget to do, after I’ve stuck a label on an email, is to delete the original Inbox label. So my inbox is still a nightmare all the time….
When I moved stuff over, it didn’t stay in the inbox. It does for you?
Thanks K.S.! Excellent tutorial.
Thanks, Craig! 🙂
Great info Kat. I have been creating and making folders since the dawn of my hotmail account, lol. In there, you can drag and drop folders within folders; I do it by accident all the type because my trigger mouse finger gets stuck and/or the computer freezes….yeah, that’s my story and I’m sticking to it. I titled my folder for Indies Unlimited the IUBlog, I have one for writing, other blogs I subscribe to, and the like. My folders list keeps growing and growing and growing. 🙂
Great, Jacquie!
Good one.
Labels are EXTREMELY important on gmail, and good reason why I advise people to use it. I have switched to it instead of using my own domain mail.
Once you get into labels, they can be used in a lot of powerful ways.It’s really important to set them up right and keep that maintained.
One is archiving. You can just get rid off tons of stuff in your inbox… but when you want to see it, select “All Mail” and check the label to bring up everything in that category.
You can use them as a simple mailing list program, actually. We first discovered this while putting together the “My Funny Valentine” anthology. We used tags to keep straight who was accepted and who we’d declined. We had tags: Lin Likes, Lin Hates, Karla Likes, Karla Hates. We could browse through looking at the other partner’s likes and if change them to either “Accepted” or “Bubble” for later review. If I read a Karla Hates that I didn’t like, I’d change it to “Rejected”. When the time came, we could just select Rejected or Accepted and bulk mail to them really easily. Once the book was completed and we started the next one, we just archived all the Valentine mail… which also had a “VD Mail” tag.
I’d say if you have a mailing list of under 500 names, Gmail is all you really need to maintain and use it. You could do more names by having several main tags to keep more than one 500 name list.
Learning how to use this stuff can REALLY help you.
Thanks, Lin!
Thank you so much for this post, Kat! Extremely helpful. I do like the email threads on gmail but I have been a bit lost with regards to the labels.
Glad it was helpful, Jo-Anne! Thanks for commenting. 🙂
I use folders but found some new tips her, thanks! Off to play. 🙂
Glad to help, Glynis!
Thank you for this tutorial, Ms. Brooks! You made the directions easy enough for me to follow! Now I should be able to keep some order in my inbox. 😀
You’re very welcome. I’m glad it was helpful! 🙂