
I’m not blind to the fact that many more books are released as eBooks than print books these days, some authors choosing never to publish paperbacks at all. However, I also know there are lots of people out there who still love books, who still enjoy the heft and weight of a tome in their hands, who still appreciate the tactile sense of sliding their fingers between paper pages and gently leafing the top one over as they read the last word on the page before them. I produce paperbacks for 99% of my books, the only exception being the collection of first chapters of my novels, a perma-free sampler which would be at cross purposes as a more expensive print version. Because I don’t see print books going away any time soon, I thought a primer on basic formatting might prove useful.
There are plenty of options for producing books, but I will focus on CreateSpace, since that’s the process I use and one of the most popular.
Book Size
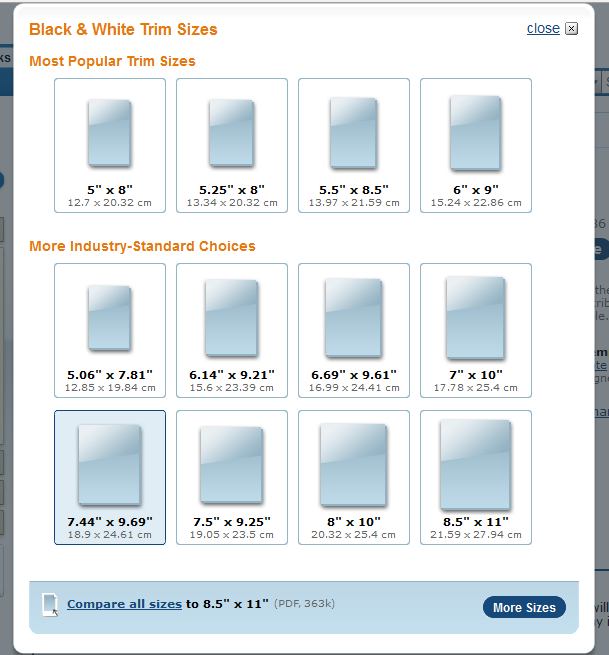
The first thing to consider is what size your book will be. CreateSpace has lots of choices there, some of which are standard sizes and are eligible for wider distribution than others. When you begin formulating your project, you can see the entire list of sizes and which are standard and get the widest distribution.
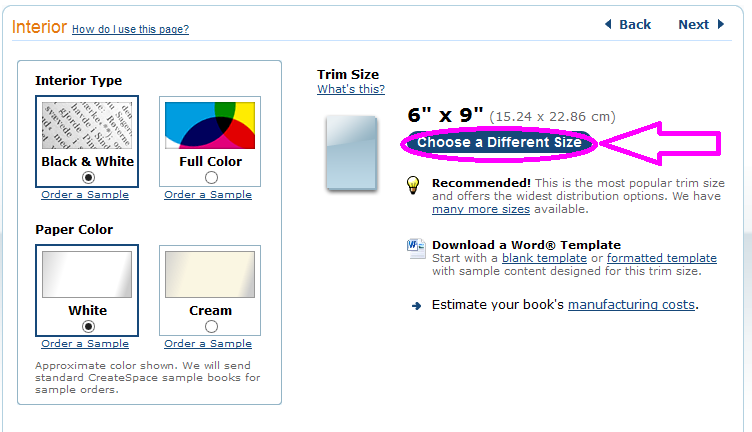
I generally choose 5.5”x8.5” for a shorter book (under 50,000 words), and 6”x9” for a longer book. These are pretty standard trade paperback sizes. I have also used 8”x10” for children’s books and my father’s art books. For the purposes of this tutorial, I will use the 5.5”x8.5”.
To format your manuscript in the size you want in Word, go to the Page Layout tab and click on the dropdown arrow in the lower right hand corner of the Page Setup ribbon. You’ll get the following dialog box.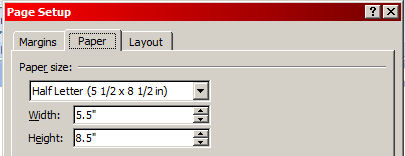
On the Paper tab (above), fill in the width and height of your pages. If these numbers match a pre-determined size (like Half Letter, above), that will fill in automatically. If it doesn’t match, Custom Size will fill in.
Now set up your margins. Click on the Margins tab (same dialog box, below) and fill in your numbers. I generally start with 1” margins all around and .25” gutter. Later on, once the book is done and I’ve determined my page count, I can manipulate that if I want by increasing or decreasing the margins a bit. Also select Mirror Margins in the Pages section of this same dialog box. This will set your book up with the extra space of the gutter at the left edge for odd-numbered pages and at the right edge for even-numbered pages, creating an allowance for the spine of the book.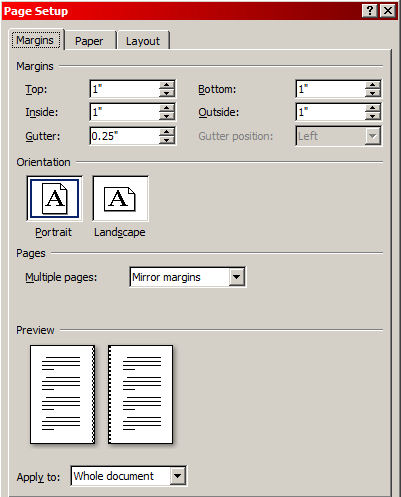
Headers
Grab a handful of books out of your own bookshelf and take a look at the headers of each. You will most likely find a range of very different styles. Some books might have no headers at all. Others might have the title of the book on the top of every page, or the title on odd-numbered pages and the author’s name on the top of even-numbered pages. These headers might be centered or justified left or right so they appear at the outside edge of each page. Some might also include the page numbers. It’s very much a matter of personal style, so choose the style you like best and go with that. I tend to put the book title and my name in the headers (see below). I have, on occasion, used the page numbers on the outside edge of the header, but more recently have switched to page numbers centered in the footer. I generally make the headers a different font than my text, and I usually size them down to maybe a 10-point size, while my text might be 11 or 12-point.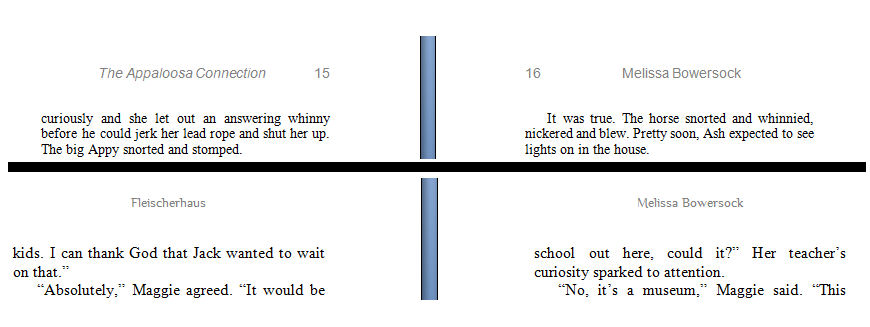
Chapter Titles
As with headers, chapter titles also come in a large variety of styles, and you’re free to use any that you like, or invent your own. You might simply number your chapters: 1, 2, 3 or One, Two, Three. You might give them titles that hint at the action to come. You can center them, justify them, underline or bold them. Just make sure you are consistent with all your chapter titles. The easiest way to do that is to create a style in Word and use that same style throughout.
Something else to consider is what page to start new chapters on. Some authors will always start a new chapter on an odd-numbered, right-hand page. Some will start them on the next page after a chapter ends, regardless of which side of the spine it’s on. Additionally, you may want your chapter to begin at the top of the page, or drop it down several lines and start closer to the middle of the page.
Chapter First Lines
Many authors adopt a different margin style for the first line of a new chapter. If your book is indented, you might want the first line of a chapter to be left-justified. You might bold the first three or four words of the sentence. Beginning the first sentence with a drop cap sets it off and gives it a nice flourish. As with all things computer, there are many ways to accomplish the same thing. And, as with the chapter titles, just remember to be consistent and do all your chapters the same way. Inconsistencies will be noticeable, and they point to a lack of editing or professional polish.
Front Matter
Before Chapter One of your book, you’ll need some front matter. This usually consists of a title page (with title, your name and your publishing company’s logo), the publication page (with copyright material and ISBN numbers), any foreword or acknowledgements, perhaps a table of contents. Some authors might choose to list their “Other Books by …” and some excerpts from advance reviews.
Back Matter
The end of the book is a nice place to put your “About the Author” information as well as a thank you to your reader and a plea for a review. We all know how important reviews are to authors, but your readers might not. It never hurts to ask. RJ Crayton suggests putting questions for book clubs in the back, too.
So there you have it; you’re ready to upload your book to CreateSpace. How easy is that? I know the first time through this process can be scary, but believe me, it’s not rocket surgery. And once you’ve completed your book in CreateSpace’s system and are holding that new baby in your hand, you’ll know it was worth the time and effort. There’s nothing like a newly-produced book to brighten your day.
Just reached out and gave you a virtual hug, Melissa! Thank you so much for the step-by-step instructions on how to format print books on CreateSpace. For those of us who are “technically challenged,” this post is a godsend!
Thank you, Linda; consider the hug virtually accepted and reciprocated! I know some people struggle with this, so thought it was time to break it down to the basics. Glad it’s helpful.
This is a great article! One other thing that I just learned (painfully) although others may know it picking your font. I mistakenly used Times New Roman at first as that was one of the “defaults” for ebooks. However, this is really ugly in a print book and added another 70 pages which upped the cost in Createspace. I’ve switched now to Garamond for the print book and it’s so much better.
LOL–I always use Times for my books. Different strokes, right? But you make a good point: there is more than one way to manipulate the page count. I talk about using margins for that, but obviously you can use your fonts, as well. Thanks for adding that.
Hi Melissa, CS also offers free book templates based on cut sizes. I use their 5×8 for all my novels so you just have to cut and paste your body text into it. The margins, gutter, paragraph and chapter breaks are all in the template if you broke your Word text with page breaks and chapter headings. You still have to follow the guidelines you posted for front and back matter, but the template will walk you through that too. The cover is the trickiest part. I use their cover maker and simply paste my pre-worked images over their boiler plate images. I’ve done 14 novels this way and never had to reject a single one for setup reasons. The proofs are a cheap way to get your books out to your readers also.
Will, glad you’ve had success with templates. To be honest, I’ve never used them and now can whip up a book in no time so probably never will. I have heard complaints that they are not easy to work with, so it’s nice to hear that you’ve had better success. I always use the Cover Creator, sometimes using a template and sometimes just uploading a full jpg for the front and back covers; depends on the book. That’s the nice thing–there are plenty of options for whatever you want to do.
Thank you Melissa – you make it sound easy 😀
I’ve done it so many times, I could do it blindfolded. The first time was a challenge, but after that, easy-peasy.
Thanks Melissa! Going the paper trail is one of the many things I’ve avoided, but now I’m feeling a lot less daunted. 🙂
Glad to hear it. We don’t want anyone here feeling daunted!