 Guest tutorial
by Nickie Storey Bailey
You may love or hate Facebook, but even with all the migraines caused by their constant changes, the company is one of the most popular social networking websites and that means many readers to possibly connect with.
I use Facebook ads at least three times a year. They are excellent for drawing attention to your author page or a particular URL/website. Do you have a book on sale or marked as free on Amazon? You can use Facebook ads to let thousands of people know about it. Are you hosting an event or book launch? Facebook ads can get the word out for you. The last time I created a Facebook ad, I got over 800 new ‘likes’ on my author page in five days.
There are several ways to use Facebook ads. In this tutorial, I am going to show you how to create an ad to get more ‘likes’ for your author page. The first thing to do is look on your Facebook page for a tab labeled Create an Ad. As I use these ads frequently, the tab is readily available in several places on my page. I do know it can be found at the bottom of your page and sometimes in the left-side bar where your Favorites, Pages, Groups, etc. are located.
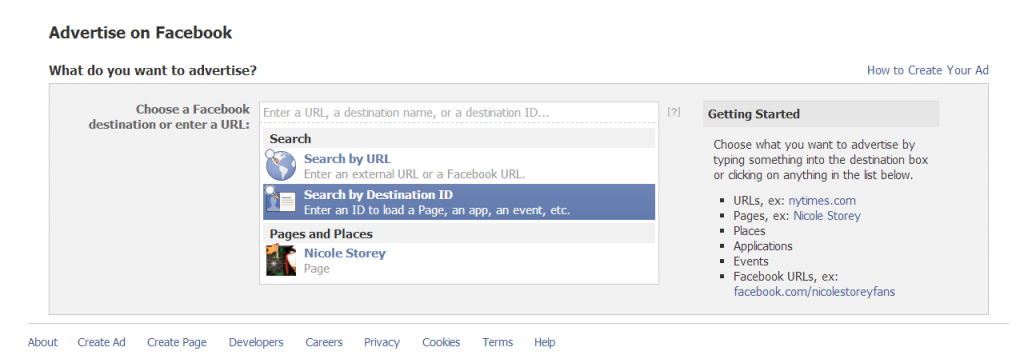
Once you find the tab, click on it. You should see a page like this (Capture1). There are four boxes to choose from. The first three are for external URLs, Facebook URLs, and apps. The one we want in order to gain more ‘likes’ is the last box, which should show your author page. Click on it.
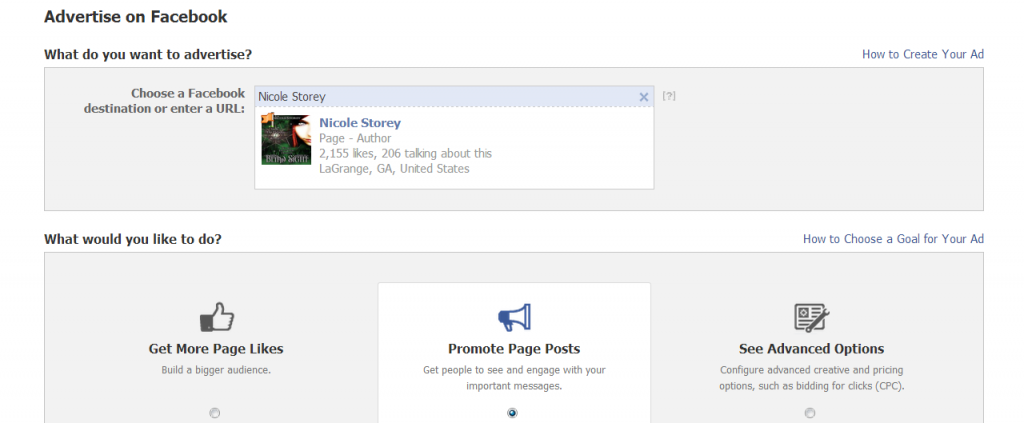
The next page you see has a lot of information on it. However, we are only going to worry about this section of it for now (Capture2). The first box confirms your Facebook author page as the destination you want. In the second box, you have three choices. The first is to get more likes on your page. The second is to promote a particular post on your author page. The third is for advances options and honestly, I have never used it. I’ve never needed to, but feel free to play around with it if you like. The box we want is the first one: Get More Page Likes.
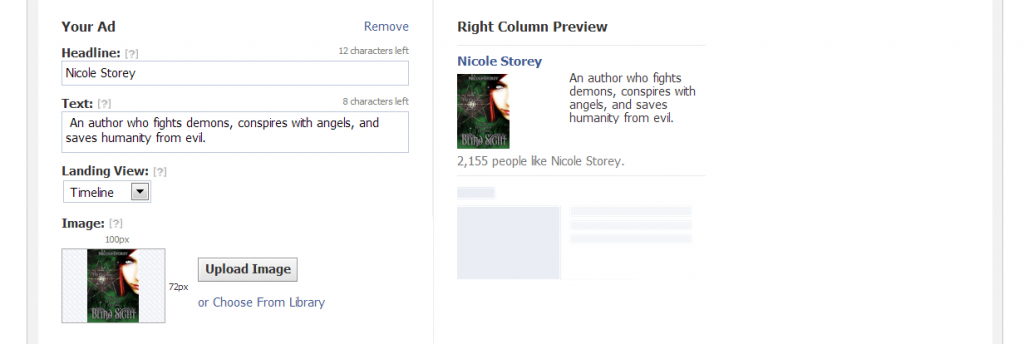
In the next section, you are going to create your ad! It is fairly simple. First, come up with a headline. Depending on what your goal is, you can use something as simple as your name, which I usually do. You only get 25 characters here, so why not let your name be the first thing people see?
In the next box, you will type the text. This is one of the most important parts. You only get 90 characters for this, so make sure you use them wisely. What do you want people to know about you? What genres do you write? Wow them with your text and make them want to click on your ad. In the Landing View box, make sure you check “Timeline.” This is where readers will end up when they click on your ad. You also have the options of taking them to your photos or to Goodreads. However, as we are advertising our Facebook author page, this is where we want the ‘likes.’ In the last box, you will choose a photo to run with your ad. If you look to the right, you will see another box that shows you what your ad looks like with every step and you can see the finished product with the photo. (Capture3)
The next step is the Sponsored Stories box. I never go with the advance options, as I see no need. I do make sure to click the box that is labeled Show Stories About: People Liking Your Page. What this does is helps others discover your page through their friends. If one of their friends likes your page, chances are they will click on it, too. I know what you’re thinking. It is hardly worth the effort if the only people who end up liking your page are friends of friends, especially since most authors on Facebook know each other anyway. Have a little faith! Trust me, we aren’t finished yet. (Capture4)
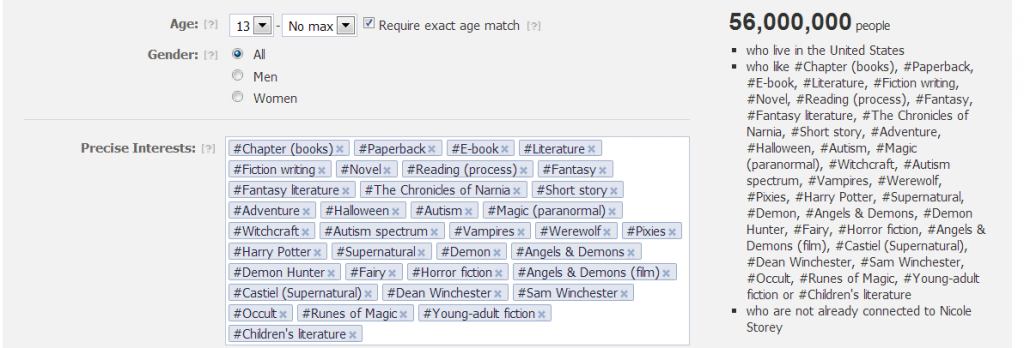
In the next section, we are going to choose our audience. This is when we build the number of potential fans who will see our ad. First, we choose the countries we want. You can choose as many as you like. I always make sure to choose the US and UK, and then I go from there. As you click throughout this section, look to your right and you will see the number of your audience go up or down, depending on your choices. Next, choose the age range and gender. I go with ages 13-No Max and for the gender, All. Now comes the fun part – choosing the interests! This is where you add categories that describe you, your writing style, genres, and books that you think potential fans will be interested in. Try to come up with as many as possible. The more you have, the higher your audience will go. For example, I would start with the obvious: Books, Reading Books, Literature, E-books…Then, I would add my genres, such as Fantasy, Paranormal, Young Adult, Juvenile Fantasy…After that, break it down even more. What are the elements in your books that certain readers may like? Magic? Animals? Witches? Werewolves? Think about your books and pick them apart. Where does the story take place? What are your characters like? What happens in the book? Are there other books on the market that have been compared to yours? My Grimsley Hollow series has been compared to Harry Potter in several different scenarios, so I might add the Harry Potter Series to my interest categories. Search around in this area and click on, or add, as many interests as you can. However, remember to be honest. You can lose as many fans as you gain if you aren’t truthful when choosing interests. Sure, adding #Magic might get you more clicks, but those fans will quickly hit the ‘Dislike’ button when they discover you actually write memoirs or self-help books. As you can see in this picture, by adding my interests, I will potentially be able to reach 56,000,000 people. (Capture5)
In the next section, you will choose your connections. I always pick “Only People NOT Connected to Me”. I mean, that’s the whole point, right? You want to find fans who don’t know about you and your books.
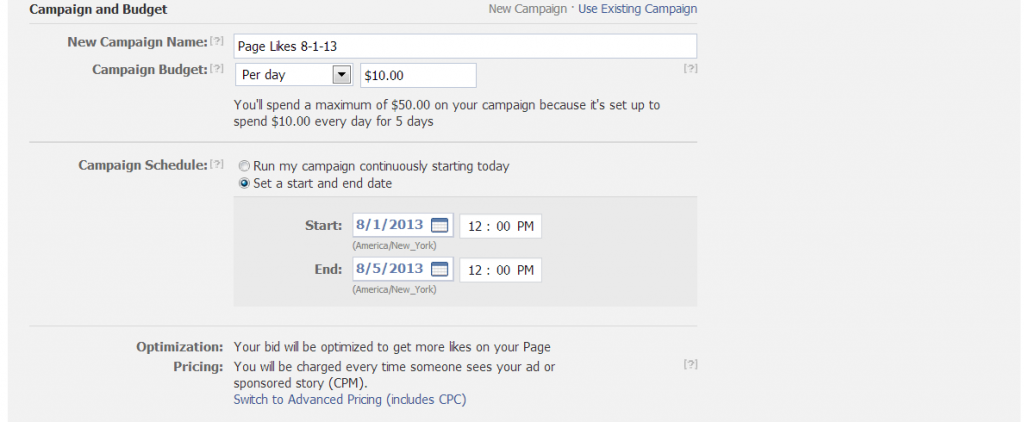
Next, set up your pricing and schedule for the ad to run on Facebook. First, choose a campaign name. This is only so you can identify it in your Ads Manager later on. No one else will see what you choose to call it. Next, choose your budget. I always click “Per Day” and how much I want to spend – say, $10. By choosing this, my ad budget will not go above $10/day. The more money you can spend per day, the more often your ad is shown. After that, choose a schedule for your ad to run. You can run it continuously (J.R. Rain does this) or you can choose a start and stop date. I usually run my ad for five days.
Now, you can also set up your ad where you pay per click. This means that every times someone clicks on your ad, you pay a certain amount — usually between .33 and $1.00 per click. This can save you money or it can cost you more. It’s a crap shoot really. You don’t know how many people may click on your ad. If I had chosen this option on the campaign where I got 800 new likes on my page, it would have cost me $264.00 instead of the $50 I paid. I would rather not take chances and know how much I am spending. However, if you’re a gambler, you can change this option in the area where you choose your objective for the ad. Instead of clicking on Get More Page Likes, you will click on the Advanced Options and go from there. (Capture6)
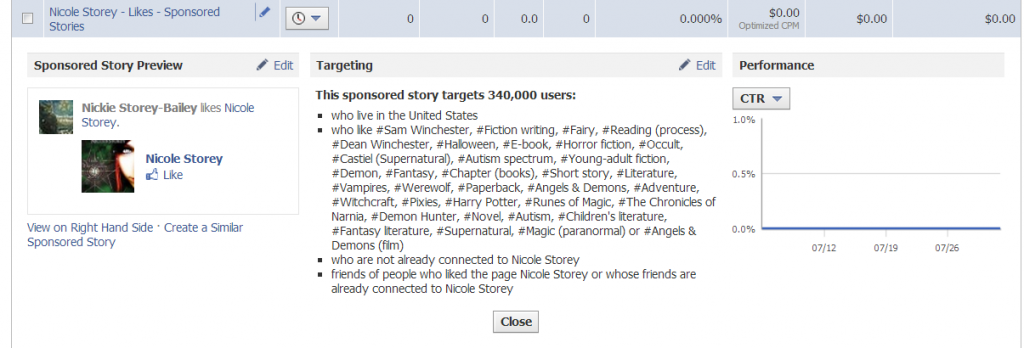
Lastly, you will review your ad and place your order. I pay via Paypal and have it set up so that I don’t have to put this information in every time I run a campaign. I have never had any problems with Facebook charging me extra or anything like that. They only take the money out that I authorize ($10/day) and I receive detailed billing from them and Paypal via email. After you place your order, you will be given an Ads Manager page, which will be accessible from your Facebook page. Mine is rather busy-looking, but I took a screen shot of what the campaign that I just created looks like on there. What? You thought I was just going through the motions for you? Nope! I created a new ad. (Capture7).
So, there you have it. I really hope you will try this at least once. We all know that marketing techniques can be hit or miss, but this is one that doesn’t have to be expensive and really has a lot of flexibility as to what you can do with it.


Great tutorial, Nickie–I’m going to give this a try. Thanks 🙂
Thanks for the tips, Nickie! I’ve promoted certain posts before, but I’ve never done a page promotion. I might have to give it a try.
Excellent guide! I’ve bookmarked this, and hope to give this a try soon. Great ad, too, by the way! Thank you, Nickie!
Thanks to you all! BTW, I got over 650 likes on my page with that tutorial. 🙂
I did a promotion like this. Facebook gave me $50 credit to use and because there were no directions on how to accept the money for my first promotion, I lost the ability to use it which was very infuriating. I am glad to learn about the per click charge. I was charged this the first time and won’t let it happen again.
I appreciate all the information.
Excellent guide, Nickie, thank you!
I just created a Facebook ad last week for the first time, and I’m learning a lot about what to do with my next one. I used the first one to promote one of my books, and will do the same next time. Thanks for the tutorial, Nickie. Now I’m going to consider getting likes!
I have always been a little leery about trying this out because I was afraid I’d mess it up. The steps you provided are easy, and came at a time I can utilize them. Thanks Nickie. Btw I just love your last cover!
Thank so much, Aron. 🙂 I recently ran my first ad for a book (it wasn’t mine, but someone else’s) and I think it helped raise his sales some. I can honestly say that I have had success with every ad I’ve run with Facebook. One particular ‘like’ ad got me over 800 likes.
Cool! Easy to understand. I did this once for a book series. You can get a lot of likes. 🙂
You sure can and it is nice to know those likes are from people who do NOT know you…but do now!!!
Bookmarked for the future. Thank you. 🙂
You are welcome. 🙂 I am so glad I can give something back after all I have learned from the pros here at IU!
Great tutorial. You’ve tempted me! And I thank you for it.
You are welcome, Anna!
Great information, Nickie. Thank you. I will Definitely bookmarks this for future reference.
Thanks, Jacque!!!